
Food photography is the professional styling, lighting, and imaging of cuisine to spark appetite and sales across menus, websites, and social feeds. It uses precise light control, color harmony, and composition to make dishes look irresistible. From our studio at 13260 236 St in Maple Ridge, BC, Silver Valley Studios creates photos, vertical videos, and brand visuals that perform.
By Sumeet S. — Founder & CEO • Last updated: 2026-05-12
At a Glance: Your Food Photography Guide
This complete guide explains how to plan, light, style, photograph, and deliver high‑performing food visuals. You’ll learn practical camera settings, lighting setups, plating strategies, social‑first formats, and a repeatable workflow we use with restaurants across Greater Vancouver—so every dish looks crave‑worthy online.
Here’s what you’ll get from this guide:
- Plain‑English definitions and why strong food visuals drive engagement
- Pro lighting and styling tactics that work on busy services
- Step‑by‑step workflow, from shot list to final delivery
- Camera settings that produce consistent results (fast)
- Social‑first framing for Reels, Stories, and TikTok
- Local tips tailored to Maple Ridge and BC restaurants
What Is Food Photography?
Food photography is the craft of styling and lighting dishes so their texture, color, and freshness translate on camera. It blends culinary knowledge with visual design to create images and short‑form video that trigger appetite and action across menus, websites, delivery apps, and social media.
At Silver Valley Studios, food photography is a service we deliver alongside restaurant interiors and ambiance coverage. We translate your brand identity into images that entice in 1–3 seconds—the average time a scroller decides to stop. Our clean, naturally balanced style uses HDR blending and cinematic lighting to keep food looking real, not overly processed.
Core components of a strong plate image
- Light direction: Side or backlight at 30–60° accentuates texture and steam.
- Color harmony: Complementary accents (e.g., parsley on tomato reds) increase contrast.
- Texture cues: Oil sheen, crispy edges, and visible steam signal “just cooked.”
- Composition: Rule‑of‑thirds grid; hero ingredient on a power point; clean negative space.
- Focus depth: f/2.8–f/5.6 for subject isolation; f/8–f/11 for menus requiring detail.
Why it matters: diners buy with their eyes first. A consistent set of 12–24 images often anchors a restaurant’s social calendar for a month, freeing your team to engage rather than scramble for last‑minute content.
Why Food Photography Matters
Compelling food visuals increase saves, shares, and table bookings. High‑quality images improve menu comprehension, boost delivery‑app click‑through, and lift social engagement. For Maple Ridge and BC restaurants competing regionally, standout photography turns casual browsers into diners.
In our experience with Greater Vancouver hospitality teams, one well‑planned shoot yields assets for menus, Google Business Profiles, delivery apps, and a month of social content. Vertical clips (9:16) and 1:1 hero frames reach new audiences fast, while cohesive color and styling build brand memory.
Business outcomes we routinely see
- Faster content cadence: A 2–3 hour session can produce 40–80 deliverables across photo and short‑form video.
- Higher engagement: Consistent lighting and framing increase saves by focusing attention on the hero bite.
- Better conversions: Clear, close‑range angles help guests decide in under 5 seconds.
- Cross‑channel mileage: One story‑driven sequence fuels Reels, Stories, and TikTok with minimal editing.
Local considerations for Maple Ridge
- Plan seasonal menus and shoots together to capture fresh local produce at peak color and texture.
- Schedule golden‑hour interiors during longer summer days; winter sessions benefit from added softbox fill.
- Align posting times with local dining rhythms (weekday lunch rush, weekend brunch) to maximize reach.
How Food Photography Works (Our Workflow)
A reliable food photography workflow starts with a creative brief and shot list, then moves through lighting tests, live plating, capture, and delivery. Clear roles, timing, and backups keep service flowing while producing consistent, on‑brand assets for menus and social.
Our repeatable process is designed for busy kitchens. It protects service, keeps dishes fresh, and ensures you get more usable assets per hour. Here’s how we run sessions for restaurants across Greater Vancouver.
- Creative brief (15–30 minutes): Clarify brand voice, color palette, hero dishes, and social priorities (Reels, Stories, Grid).
- Shot list (10–15 frames per dish): Overhead, 45°, detail macro, action pour, utensils‑in‑frame, team moments.
- Lighting plan: Window light + 1–2 softboxes; 2:1 key‑to‑fill ratio; flags to control glare.
- Plating sequence: Build from base to garnish; add fresh herbs and dressings last 10–20 seconds before capture.
- Capture settings: 1/125–1/200 sec, f/3.2–f/5.6, ISO 100–400; manual white balance 3200–5600K.
- Short‑form video clips: 10–20 second takes: butter sizzle, steam lift, garnish drop, slice reveal.
- Live review: Tether to tablet so chefs approve texture and doneness before the plate wilts.
- Backup + delivery: Dual‑card capture, cloud backup same day, curated gallery arranged by dish.
Want cinematic motion? Our videography services pair delicious close‑ups with 4K movement and ambient audio to tell a complete brand story in under 30 seconds.
| Setup | Best For | Pros | Watch‑outs |
|---|---|---|---|
| Window + reflector | Natural, airy salads; pastries | Soft falloff; true color | Shifts with clouds; time‑bound |
| Softbox key + fill | Even menus; dinner service | Repeatable; controllable glare | Needs power and space |
| Backlight + rim | Steam, drinks, glossy sauces | Texture pop; drama | Can show fingerprints; clean plates |
Types, Methods, and Approaches
Use a mix of hero shots, process macro, ambiance frames, and short‑form vertical clips. Combine overheads for clarity, 45° plates for depth, and tight textures for appetite. Add team and interior context so your brand feels welcoming and real.
Still photo angles that convert
- Overhead (90°): Perfect for spreads, pizzas, and bowls. Align plates on a 3×3 grid; keep edges parallel.
- Three‑quarter (35–55°): Most “scroll‑stopping” angle; shows height, layers, and texture.
- Macro detail (1:1 reproduction or close focus): Capture sugar crystals, grill marks, or sauce ripples.
- Environmental: Table‑level with bokeh lights to communicate atmosphere.
Short‑form motion that hooks viewers
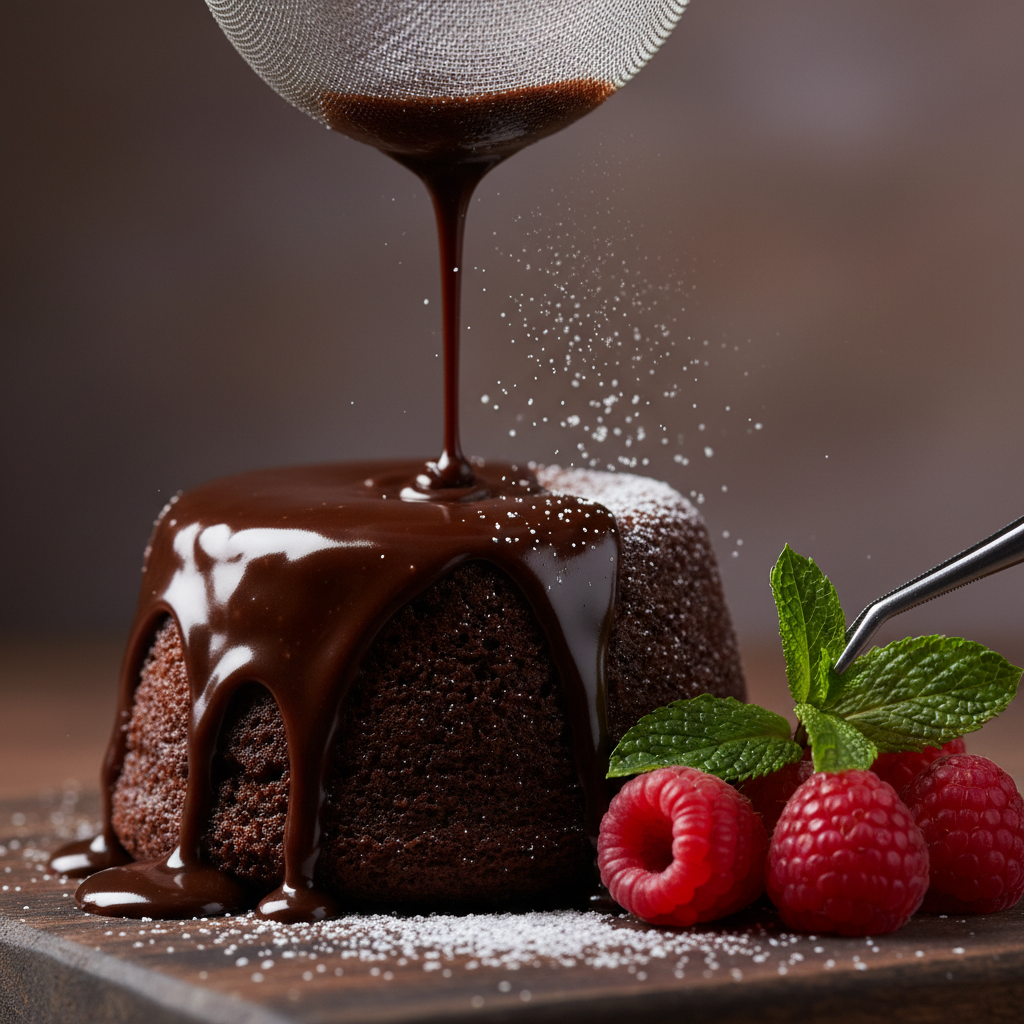
- Garnish drop in slow‑motion (120 fps → 24 fps): Microgreens or powdered sugar fall creates drama.
- Pour shot: Chocolate, olive oil, or latte art—use backlight for highlights.
- Steam lift: Backlight at 30–45° makes vapor visible; capture 5–8 seconds.
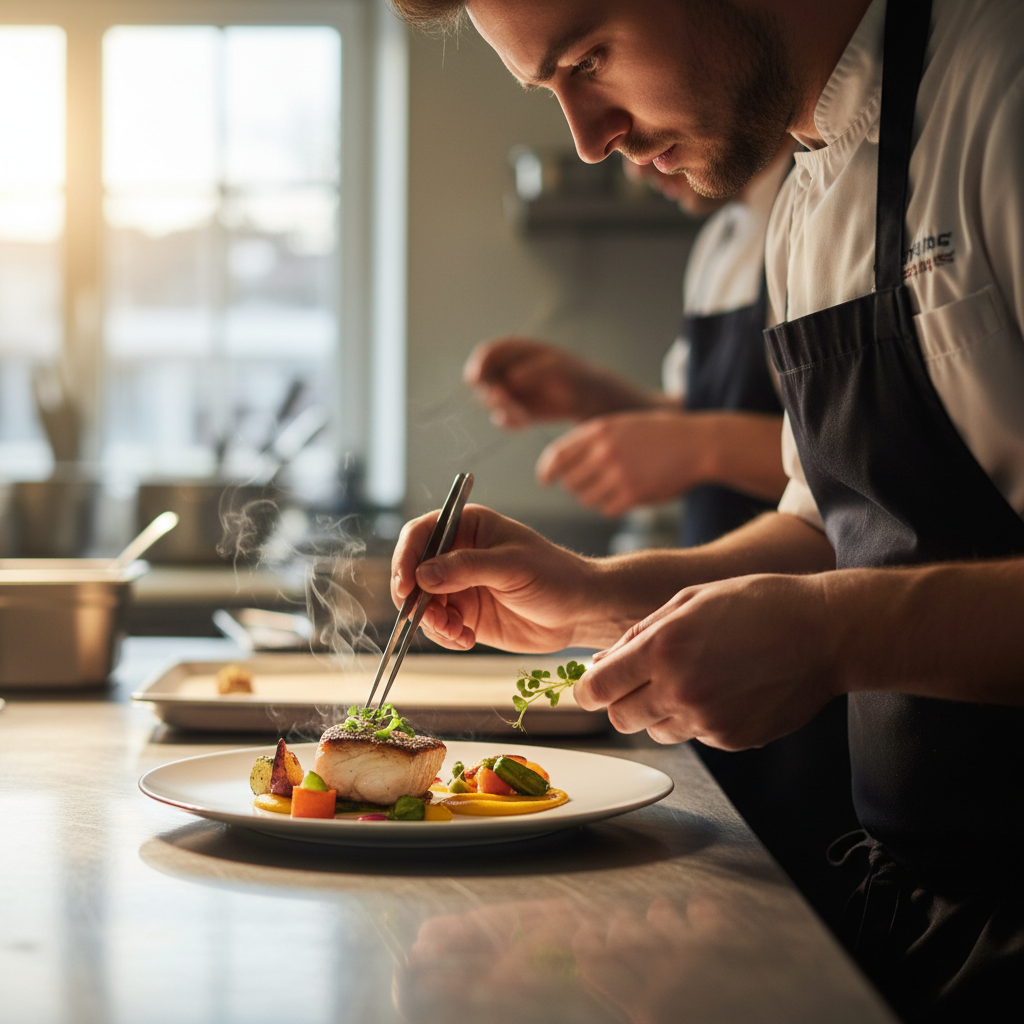
- Team moments: Chef’s hands, finishing touches, and quick smiles humanize your brand.
Brand‑forward details to include
- Signature plateware or branded napkins for subtle recognition
- Ingredient story: raw produce, spice piles, or dough stretching
- Ambiance elements: wood textures, greenery, or window reflections
- Seasonal cues: citrus in winter, berries in summer, grilled char in late spring
For a real‑world example of a balanced set, browse our restaurant case study in the Gourmet Bistro project and our broader portfolio to see how hero dishes pair with interiors and team energy.
Best Practices for Consistent Results
Keep your lighting simple and repeatable, standardize camera settings, and style plates with intention. Work in short sprints so food stays fresh, and pre‑visualize 10–15 frames per dish. Consistency across angles and color is what turns one great shot into a persuasive set.
Lighting and exposure
- Key/fill ratio: Start at 2:1; increase to 3:1 for crisp texture on fried items.
- Diffusion: 24–48 inch softbox; add parchment or scrim for specular highlights.
- Polarizer: Cut unwanted glare on glossy ceramics or sauces; rotate while looking through EVF.
- White balance: Lock Kelvin to 4300–5200K for daylight‑balanced realism.
- Shutter/aperture: Action pours at 1/250 sec; static plates at 1/125 sec; apertures f/3.2–f/5.6.
Styling and plating
- Fresh last: Add herbs and dressings 10–20 seconds before capture for optimal sheen.
- Height and layers: Stack proteins lightly; tuck garnishes to reveal edges and textures.
- Color contrast: Look for a warm‑cool interplay (orange yolk vs. green arugula).
- Clean edges: Wipe rims; use tweezers for crumb control; keep props minimal.
Workflow and delivery
- Tether review: Chef signs off quickly; prevents re‑plates and saves prep time.
- Redundancy: Dual‑card writing (RAW + JPEG) and immediate cloud backup reduce risk.
- Naming convention: Dish‑shortcode_YYYYMMDD_frame### keeps galleries searchable.
- Export sets: 4:5, 3:2, and 1:1 crops plus vertical 9:16 clips for social platforms.
If you need a plan you can hand to your team, this practical photography checklist outlines a simple pre‑shoot routine and gear audit that adapts well to kitchens.
Tools and Resources We Rely On
Start with a fast 50 mm or 24–70 mm lens, a sturdy tripod, a large softbox, and reflectors. Add a macro‑capable lens for texture, a circular polarizer for glare, and a tethered tablet for live approvals. Keep backups and a small prop kit ready.
Core kit
- Lenses: 50 mm f/1.8 (budget hero); 24–70 mm f/2.8 (versatile); 90–105 mm macro (detail).
- Support: Tripod with overhead arm; sandbags for stability in tight dining rooms.
- Light: 1–2 LED panels or strobes with 24–48 inch softbox; 5‑in‑1 reflector; black flags.
- Color: Gray card and color checker for accurate skin tones and food hues.
On‑set essentials
- Gaffer tape, binder clips, and dental wax to stand up fries or props
- Atomizer for light mist on greens; oil spray for controlled sheen
- Tweezers, microfiber cloth, and rim wipes for spotless plates
For social and video deliverables that match your brand story, explore our full services and end‑to‑end portfolio. When you’re ready to add motion, our videography services include cinematic 4K and vertical formats.
Want a simple one‑page creative brief template? This Shopify creative brief is a great starting point you can adapt for food shoots.
Case Studies and Real Examples
We combine hero dishes, ambiance, and team moments to build crave‑worthy sets. The result is a month of social content and refreshed menus from one session. Here are patterns that consistently deliver across Maple Ridge and the Greater Vancouver hospitality scene.
Restaurant case: Bistro refresh
For a local bistro re‑launch, we built a 30‑frame shot list: 12 hero plates, 6 ambiance frames, 4 team details, and 8 short clips. The mix covered menus, Reels, and a delivery‑app gallery. See a similar approach in our Gourmet Bistro project.
- Angles: 45° plates for height; overhead for spreads; macro for textures.
- Light: Window key with softbox fill at 2:1 ratio; flags to cut glass glare.
- Deliverables: 18 edited stills; 6 vertical clips; 6 ambiance details.
Brand story: Kitchen to counter
A counter‑service concept needed a “farm to line” narrative. We shot produce prep, grill sizzle at 120 fps, and final plate hand‑off. A 20‑second vertical edit became their profile pin and boosted saves thanks to clear process beats.
Commercial crossover
Food pairs naturally with space. For commercial shoots, we capture brand visuals that connect interiors with product stories. See our commercial shoot example for how we approach cohesive storytelling beyond the plate.
Explore more examples in our portfolio and learn about our team on the About Us page.
Social‑First Deliverables That Perform
Frame for 9:16 vertical, keep clips 6–20 seconds, and front‑load action in the first 1–2 seconds. Loopable pours, garnish drops, and team moments outperform static posts and turn casual viewers into followers and diners.
- Aspect ratios: 9:16 Reels/Stories; 1:1 grid thumbs; 4:5 for depth on Instagram feed.
- Hook timing: Show motion at 0:00–0:02; add a second beat at 0:03–0:05.
- Audio: Kitchen sounds (sizzle, chop, clink) increase watch time—capture wild audio.
- Text overlays: Keep brand fonts readable; use 4–6 words max per beat and safe margins.
When your story calls for aerial context or exterior ambiance, we pair interiors and plates with exterior coverage and storefront hero frames as part of cohesive brand visuals.
SEO, Delivery, and Usage Essentials
Name files clearly, compress responsibly, write descriptive alt text, and export purposeful crops. Organize galleries by dish and use consistent metadata so your visuals load fast and rank well on search and delivery platforms.
- File naming: brand_dish‑descriptor_YYYYMMDD_###.jpg
- Crops: Export 3:2 and 4:5 stills, plus 9:16 vertical for Reels/TikTok.
- Alt text: Describe key ingredients and style in 8–14 words; avoid keyword stuffing.
- Compression: Balance quality and load speed for mobile diners.
For non‑technical teams, these image optimization tips are a helpful primer on naming, sizing, and alt text best practices.
FAQ: Food Photography for Restaurants
These quick answers cover timing, prep, ownership, and what to expect on shoot day. Share with your kitchen and front‑of‑house teams to keep the session smooth and efficient.
How long does a typical restaurant shoot take?
Most sessions run 2–3 hours and cover 6–12 dishes with short motion clips. We build a precise shot list and sequence plating to keep food fresh and service uninterrupted. Asset counts vary by complexity and how quickly dishes can be plated and approved.
What should our team prep before you arrive?
Confirm the menu list, designate a plating lead, set aside pristine plateware, and gather props that match your brand palette. Pre‑portion garnishes and sauces, and print the shot list for the pass. A tidy staging area speeds up approvals.
Do we receive social‑ready vertical video as part of the session?
Yes—our sessions prioritize 9:16 clips designed for Reels, Stories, and TikTok. We capture 6–20 second beats like garnish drops, pours, and steam lifts, then deliver curated edits aligned to your brand voice and posting cadence.
Can you photograph our interiors and team along with dishes?
Absolutely. We combine plates with interiors, ambiance, and team moments for a complete brand story. This mix supplies menus, web galleries, and a month of social content from a single, well‑planned session.
How do you keep colors accurate under mixed kitchen lighting?
We lock Kelvin white balance, use a gray card at the start of each set, and flag stray light sources. In post, a color checker and consistent profiles keep greens natural and sauces rich—without artificial oversaturation.
Conclusion and Next Steps
Great food photography blends light, timing, and brand story. With a clear shot list, simple lighting, and social‑ready framing, one session can fuel menus and content for weeks. Ready to make every dish look better—consistently and fast?
Key takeaways:
- Plan the story first: 10–15 frames per hero dish is a reliable target.
- Light for texture: 2:1 key‑to‑fill and side/backlight make food feel fresh.
- Deliver for platforms: export 4:5, 1:1, and 9:16 with clear file names.
- Mix plates with people and place for a brand story that sticks.
Soft CTA: If you’re in Maple Ridge or Greater Vancouver, we’d love to help you plan a fast, effective session. Explore our services and portfolio, then reach out to schedule a discovery call. Prefer video‑led storytelling? See our videography services.