
Realty photography is the professional creation of listing-ready images and media—photos, video tours, floorplans, and aerials—that help homes sell faster. For Maple Ridge and the wider BC market, it means consistent lighting, accurate spatial detail, and story-driven visuals produced on a reliable timeline. Done right, realty photography shortens days on market and boosts buyer confidence.
By Sumeet S. — Founder & CEO, Silver Valley Studios Inc. | Last updated: 2026-06-19
Above-the-Fold: Hook and Table of Contents
You win listings with speed, quality, and clarity. This guide shows how modern realty photography streamlines prep, shoot, and delivery so you publish faster—without sacrificing polish. Use the table of contents to jump to definitions, process, media types, best practices, tools, case studies, and FAQs.
Use this complete, practical playbook to plan faster shoots, keep brand consistency, and publish standout listings across MLS, social, and portals.
- What Is Realty Photography?
- Why Realty Photography Matters
- How Realty Photography Works
- Types of Realty Photography and Media
- Best Practices Realtors Can Implement
- Tools and Resources We Rely On
- Case Studies and Real-World Examples
- Frequently Asked Questions
- Key Takeaways
- Conclusion and Next Steps
- Related Articles
Quick Summary
Realty photography is a system: pre-shoot prep, efficient capture, and rapid post-production. Blend HDR for balanced light, add drone for context, and pair floorplans and video for clarity. Standardize checklists and file naming to publish faster while maintaining high visual quality.
In our experience, the teams who scale listing output do four things consistently: prepare properties, use a repeatable on-site flow, pair photos with floorplans or video, and keep delivery friction low with clear file organization.
What Is Realty Photography?
Realty photography is the professional capture and delivery of listing media—photos, video tours, floorplans, and aerials—designed to communicate space and lifestyle quickly and accurately. It blends technical lighting, composition, and post-processing with a story-first approach that builds buyer trust and speeds decisions.
At Silver Valley Studios Inc., we define realty photography as the core layer of a listing’s marketing stack. It includes:
- HDR photos for clean, naturally balanced interiors and exteriors.
- Cinematic 4K video tours to convey flow and finishes.
- 2D floorplans so buyers grasp layout at a glance.
- Drone media to show lot lines, neighborhood context, and curb appeal.
- Vertical videos optimized for social discovery and retargeting.
This mix answers three buyer questions: What does it look like? How does it live? Where does it sit? When those answers are fast and clear, serious inquiries rise.
Why Realty Photography Matters for Modern Listings
Quality listing media drives attention, trust, and action. In Maple Ridge and across BC, consistent, bright visuals reduce uncertainty, increase saves and shares, and encourage qualified showings. The more complete your media set, the less friction buyers feel—and the faster strong offers arrive.
Here’s why it moves the needle for realtors and developers we serve across Greater Vancouver and Vancouver Island:
- Attention economics: Buyers scan dozens of listings quickly. Crisp hero images and tidy thumbnails stop the scroll.
- Trust signals: Balanced lighting and accurate color make finishes feel true-to-life, limiting surprises on tour.
- Decision speed: Video tours, vertical clips, and floorplans prequalify buyers before they book a showing.
- Listing leverage: Strong media supports your brand at listing presentations and often secures the next client.
Local considerations for Maple Ridge
- Plan shoots around seasonal daylight—winter afternoons get dim quickly. Morning sessions often deliver cleaner window views.
- Expect frequent rain; schedule a fallback day for exteriors and drone. Interiors can proceed with HDR and continuous lighting.
- Families working from home are common. A fast, room-by-room flow minimizes disruption while keeping spaces photo-ready.
We align our approach to these realities so your listing hits the market on schedule—with media that works on MLS, social, and paid campaigns.
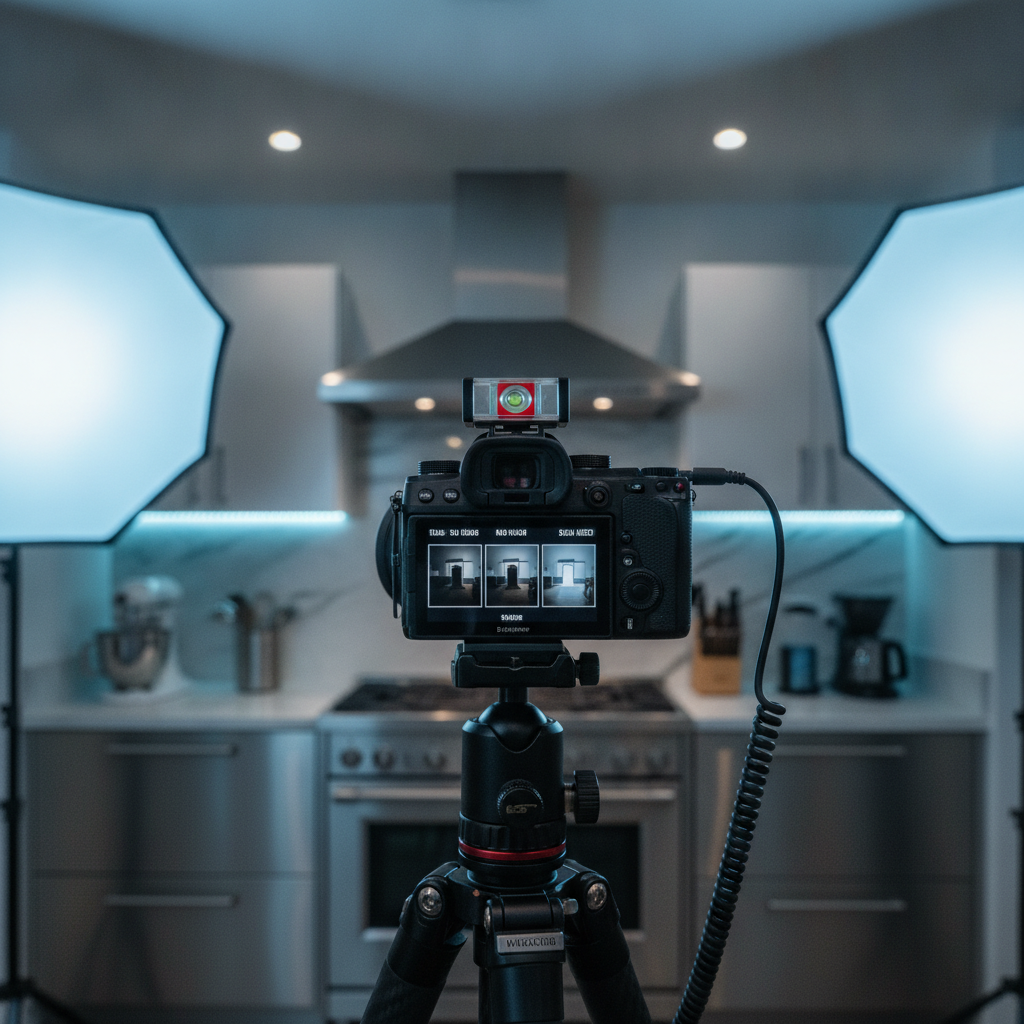
How Realty Photography Works, End-to-End
The process is three parts: prepare the property, capture efficiently, and deliver fast. Use a pre-shoot checklist, follow a repeatable on-site path, and standardize edits and exports. Pair photos with floorplans or video to answer layout questions and accelerate buyer decisions.
Pre-shoot preparation
- Confirm access, parking, and alarm codes; gather Wi‑Fi if applicable for smart-home demos.
- Send a tidy-up checklist: declutter counters, hide bins, align chairs, open blinds, and replace burnt bulbs.
- Stage light: neutral throws, symmetrical pillows, and one plant per surface to add life without clutter.
On-site capture flow
- Coverage order: Exterior front, foyer, main living areas, kitchen, dining, primary suite, remaining beds/baths, utility, backyard, exterior back, and neighborhood context if scheduled.
- Exposure bracketing: Capture 3–7 exposures per angle for balanced HDR blending.
- Perspective control: Keep verticals straight with tripod and level; shoot at ~4–4.5 ft camera height for natural perspective.
- Angle logic: One wide to show context, one alternate to feature detail (island, fireplace, built‑ins).
Post-production and delivery
- Blend HDR to natural tones, correct white balance, and remove minor distractions where ethical.
- Export MLS-friendly and web-optimized sets; maintain a social folder with square and 9:16 crops.
- Deliver via branded gallery with logical room-by-room sequencing and a simple download structure.
| Phase | Primary Goal | What We Standardize | Outcome |
|---|---|---|---|
| Pre‑shoot | Ready the space | Client checklist, shot list, schedule | Clean set, fewer reshoots |
| Capture | Efficient coverage | Room order, tripod height, brackets | Consistent frames, fewer misses |
| Post | Natural, accurate edits | Color profile, lens corrections | Polished media, fast exports |
| Delivery | Frictionless handoff | File naming, galleries, crops | Faster publish, easy reuse |
For a deeper dive into video capture within this flow, see our real estate videography guide and our videography services overview.
Types of Realty Photography and Media
Combine clean HDR photos, cinematic video tours, floorplans, and drone to tell a complete story. Each media type solves a different buyer question—from finishes and light quality to layout and lot context—so together they reduce friction and help listings convert faster.
HDR photos (the foundation)
- Blend 3–7 brackets for natural dynamic range; keep window views believable.
- Use tripod and level to maintain straight verticals and consistent heights.
- Deliver a balanced mix: exterior hero, main living, kitchen features, baths, bedrooms, and outdoor living.
Daylight, twilight, and blue-hour exteriors
- Daylight: Honest color, clear shadows, and true finishes—ideal for most listings.
- Twilight: Warm interior glow against a cooler sky to emphasize curb appeal and outdoor lighting.
- Blue hour: Soft, even ambient light—great for reflective surfaces and modern builds.
Drone photos and aerial video
- Show rooflines, landscaping, privacy, and proximity to amenities with contextual sweeps.
- Golden-hour flights highlight textures and lot depth; plan for wind and rain windows.
- Operate within local regulations and weather constraints; safety and compliance come first.

2D floorplans
- Provide instant spatial understanding; buyers evaluate fit without guessing.
- Standard annotations: room labels, interior dimensions, and key features.
- Pair with photos for each room to connect imagery to layout.
Cinematic 4K and vertical video
- 4K tours for MLS and YouTube detail; smooth gimbal moves and real-time exposure control.
- 9:16 vertical clips for Instagram Reels and TikTok discovery; punchy cuts and on-screen pacing.
- Shoot at 24fps for cinematic feel, or 60fps for smooth slow‑motion detail highlights.
Explore more photo fundamentals in our real estate photography guide and see how we apply this stack in Vancouver in our Vancouver photography overview.
Best Practices Realtors Can Implement Today
Standardize prep, simplify the on-site path, and publish consistently. A tidy checklist, a reliable room order, and predictable deliverables reduce delays. Pair photos with floorplans or video for clarity. Keep social crops ready so your team can market the listing the same day.
Before the shoot
- Agree on a shot list that reflects the home’s story (views, chef’s kitchen, yard, storage).
- Request minor maintenance ahead of time: bulb swaps, door alignment, and clean windows.
- Hide branded items and personal photos; ensure clear counters and made beds.
During the shoot
- Walkthrough first to confirm staging priorities and open all blinds where appropriate.
- Close toilet lids, straighten frames, align chairs and barstools to reduce retouching later.
- Capture one detail per room (tile, hardware, millwork) for social cutaways.
After the shoot
- Publish the MLS set, then roll out video and vertical clips over the first 72 hours for momentum.
- Use a consistent file convention (e.g., Front-Exterior-01, Kitchen-02) to speed team collaboration.
- Document learnings per property: what resonated on social, what buyers asked about, what to feature next time.
When you need a partner to operationalize this cadence week after week, we detail our approach in our professional real estate photography guide and our service overview.
Tools and Resources We Rely On
Use reliable mirrorless cameras, sharp wide-angle lenses, stable tripods, and balanced lighting. Add gimbals for smooth video, drones for context, and calibrated monitors for accurate edits. A consistent toolkit means faster setups, predictable quality, and fewer reshoots.
Capture kit
- Full-frame mirrorless body with bracketing and tether options.
- Wide-angle lens in the 14–24mm range for interiors; a 24–70mm for details.
- Carbon-fiber tripod with center column and bubble level; remote trigger for stable brackets.
- Portable LED panels or strobes for fill when natural light is uneven.
- Motorized gimbal for buttery 4K walkthroughs and reveal shots.
Drone and compliance
- Weather-aware planning with wind thresholds and rain contingencies.
- Check local regulations and airspace, maintain visual line of sight, and prioritize safety.
- Golden hour flights add texture and depth; midday is best for clear rooflines.
Editing and delivery
- HDR blending with natural color profiles; lens corrections and perspective control.
- 9:16, 1:1, and 16:9 exports for social and MLS; consistent thumbnails improve click-through.
- Cloud galleries with room-by-room folders for fast team access and reuse.
For a side-by-side of common deliverables, bookmark our realtor photography guide and compare formats in the companies overview.
Need a hand planning your next launch? We handle photos, cinematic tours, vertical clips, 2D floorplans, and drone in one coordinated visit so you publish faster with consistent visuals. Reach out via our real estate photography services.
Case Studies and Real-World Examples
Speed plus completeness wins. These mini case studies show how pairing photos with video, floorplans, and drone clarified layout and lifestyle, helping listings publish quickly and attract serious buyers in Greater Vancouver’s competitive market.
Maple Ridge family home launch
- Challenge: Tight timeline; cloudy forecast; family working from home.
- Approach: HDR interior set, blue-hour exterior, and a simple 2D floorplan for layout clarity.
- Outcome: Smooth publish sequence—MLS set day one; vertical teasers days two–three—to maintain momentum.
Surrey townhome with limited natural light
- Challenge: North-facing main floor with dark finishes.
- Approach: Balanced HDR with selective fill light; detail shots of storage and work-from-home space.
- Outcome: Clean, inviting frames that felt true-to-life and encouraged qualified showings.
Langley new-build lifestyle positioning
- Challenge: Communicate premium finishes and neighborhood context.
- Approach: 4K video tour with gimbal reveals, drone sweeps at golden hour, and a labeled floorplan set.
- Outcome: A cohesive media package that supported digital ads and social retargeting.
Want to see how this translates in the city? Our Vancouver overview breaks down media choices by property type and neighborhood vibe.
Frequently Asked Questions
Great results come from preparation and a clear plan. These quick answers cover timelines, scope, and what to expect so you can move from listing agreement to live publish with fewer surprises and reshoots.
What is included in realty photography?
A standard package centers on HDR photos, with optional add-ons like cinematic 4K video tours, 2D floorplans, vertical social clips, and drone media. Together they explain finishes, layout, and context so buyers can decide faster.
How should I prepare a home before the shoot?
Declutter counters, hide bins and cords, replace burnt bulbs, open blinds, and make beds with simple, neutral bedding. If possible, schedule minor maintenance a day prior and plan pet care to keep rooms clean and calm during capture.
Do I need drone photos for every listing?
Not every property needs aerials. Use drone when rooflines, landscaping, views, or neighborhood context are selling features. For dense tree cover or poor weather, prioritize interiors, exteriors, and floorplans, and schedule aerials when conditions improve.
What file formats do you deliver?
We provide MLS-optimized JPEGs for speed and compatibility, plus web-ready sets and social crops (9:16 and 1:1). Video exports include 4K masters and platform-specific versions for fast posting.
Where can I learn more about your process?
See our end-to-end approach in the real estate photography guide and how we structure shoots in our professional overview. For video specifics, visit the videography guide.
Key Takeaways
Prep, process, and pairing win. Prepare spaces with a checklist, follow a repeatable on-site flow, and pair photos with floorplans or video. Keep delivery friction low with logical file naming and social-ready crops so your team can market the same day.
- Clarity reduces buyer friction—use floorplans and clean HDR to answer questions fast.
- Consistency wins over one-off hero shots—standardize capture height, angles, and edits.
- Context sells—use drone and lifestyle video to frame location and flow.
- Distribution matters—prep assets for MLS, websites, and social on day one.
Conclusion and Next Steps
Realty photography is a repeatable system that shortens time to market and strengthens every listing presentation. When photos, video, floorplans, and drone are planned together, you publish faster and convert more serious buyers. Ready to operationalize this for your team?
We coordinate HDR photos, cinematic tours, vertical clips, 2D floorplans, and drone in a single visit—built for Maple Ridge and Greater Vancouver timelines. Explore our real estate photography services or our Vancouver overview to get started.
Related Articles
Deepen your strategy with adjacent topics. Explore our foundational photography principles, end-to-end Vancouver insights, and how video fits your launch plan. These pieces help you coordinate media and publish confidently on tight timelines.
For foundational capture and editing principles, see the real estate photography guide. For city-specific planning, our Vancouver photography overview explains neighborhood considerations. To integrate video effectively, review the real estate videography guide.
For inspiration on cohesive visual systems beyond listing media, browse portfolio examples of brand collateral and layouts: a sample property brochure layout, a clean premium template example, and a graphics portfolio category that shows consistency principles.