
Menu photography is the professional process of styling and photographing dishes so they look accurate, appetizing, and consistent across print and digital menus. Strong menu photos guide choices and lift conversion on delivery apps and websites. From our Maple Ridge, BC studio at 13260 236 St, we plan, light, and capture menu images that drive sales.
By Sumeet S., Founder & CEO — Silver Valley Studios Inc.
Last updated: 2026-06-10
Overview: Menu Photography at a Glance
Menu photography delivers consistent, on-brand food images that increase orders and reduce decision friction. This guide covers strategy, styling, lighting, workflow, and tools—plus real examples from our restaurant shoots—so you can plan sessions that produce reliable, mouthwatering visuals for print menus, websites, delivery apps, and social media.
Here’s what you’ll get from this complete guide.
- Clarity: What menu photography is and how it boosts orders.
- Process: A start-to-finish workflow you can reuse every season.
- Techniques: Lighting, styling, angles, and file delivery standards.
- Actionables: Shot lists, prop kits, plating tips, and a pre-shoot checklist.
- Examples: Real scenarios from Maple Ridge and across Greater Vancouver.
Use this as a playbook for your team or as a primer before hiring us for restaurant photography, vertical videos, and brand visuals.
At a Glance: Table of Contents
- What Is Menu Photography?
- Why Menu Photography Matters
- How Menu Photography Works
- Types, Methods, and Approaches
- Best Practices
- Tools and Resources
- Shot List Templates & Checklist
- Brand Style & Consistency
- Menu SEO, Alt Text & AEO
- Platform Specs & Delivery
- Case Studies & Examples
- FAQ
- Conclusion & Next Steps
What Is Menu Photography?
Menu photography is the specialized practice of creating accurate, appealing food images for printed menus, in-store boards, websites, delivery platforms, and social media. It blends culinary styling, lighting control, and brand art direction to present dishes consistently while setting correct expectations for portion size, color, and texture.
In our shoots, we combine culinary prep with design intent. That means every hero image feels delicious and stays true to what the guest receives. Consistency across your menu keeps decisions fast and reduces order regret.
- Purpose: Show real portions, textures, and ingredients to guide ordering.
- Outputs: Hero dish images, ingredient details, beverages, and combo shots.
- Formats: Print-ready TIFFs/PNGs and optimized JPEG/WebP for web/app menus.
- Branding: Plateware, backdrops, and props aligned with your identity.
- Reuse: Crop-safe compositions for in-store, website, and vertical reels.
The reality is simple: guests trust what they can see. When your images tell the truth attractively—without “over‑promising”—your reviews and reorders improve. We anchor each session to brand, category logic, and honest portions, then build a reusable asset library you can update each season.
We regularly translate a restaurant’s brand voice into food visuals. For casual concepts, we keep motion and crumbs; for fine dining, we use softer light and minimalist props. Either way, the goal is simple: make people hungry and confident.
Why Menu Photography Matters
Great menu photos increase order volume and average ticket while reducing decision time. In neighborhoods like Maple Ridge and the wider BC market, clear, enticing visuals differentiate restaurants on delivery apps and local search, helping guests choose faster and feel great about what arrives at their table or door.
Photos sell the story before service does. When your menu photography matches your brand and the actual dish, three things happen: guests order faster, reviews improve, and returns decrease.
- Decision speed: Clear photos cut scanning time and nudge immediate action.
- Expectation setting: True-to-life color and portion sizing protect reviews.
- Cross-sell: Sides, beverages, and add-ons shine in combo and carousel shots.
- Operational help: Visual standards guide back-of-house plating consistency.
- Brand equity: Cohesive imagery lifts perceived quality across channels.
We’ve found that adding appetizing, consistent imagery across web and delivery channels often correlates with higher saves and shares on social—and a noticeable uptick in first‑time orders during the first weeks after launch. In our experience working with casual and upscale concepts around Greater Vancouver, teams also report faster staff training because plating targets are visible and standardized.
Local considerations for Maple Ridge
- Lean into seasonality: local berries, salmon, and produce photograph beautifully and resonate with BC diners in spring/summer menus.
- Plan for weather and light: fall/winter overcast in Maple Ridge is ideal for diffused daylight sessions near windows.
- Prep for weekend rush: schedule shoots mid‑morning on weekdays to avoid service conflicts and keep dishes fresh and punctual.
How Menu Photography Works (Start to Finish)
A reliable menu photography workflow moves from discovery and shot list to styling, controlled lighting, capture, backup, retouching, and on‑brand delivery. Standardizing these steps ensures accurate color, consistent angles, and files sized for print, web, and delivery platforms—without interrupting your kitchen’s normal service rhythm.
We keep the process tight so your team can focus on service while we build a visual library that lasts all season. Below is the approach we use for restaurant clients across Maple Ridge, Surrey, and the wider Lower Mainland.
Pre‑production
- Discovery call: Define brand tone, hero dishes, plating standards, and usage (print, web, apps, social).
- Shot list: Group by categories (starters, mains, desserts, beverages) with hero/secondary priorities.
- Props + surfaces: Plateware, cutlery, linens, and backdrops that reinforce your story.
- Logistics: Kitchen coordination, cook times, and a holding area for plating and steam.
- Contingencies: Back‑up ingredients, duplicate garnishes, and a “re‑fire” plan for fragile items.
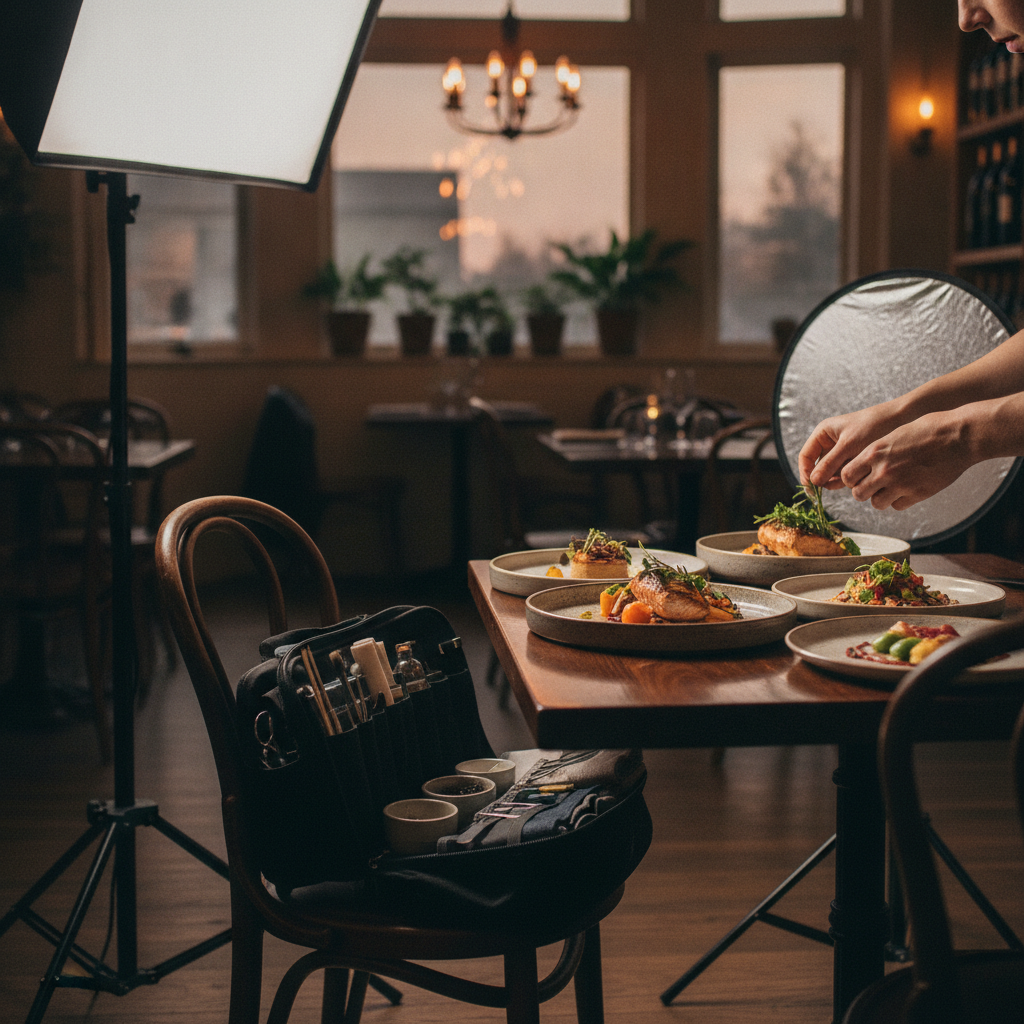
Production day
- Lighting: Diffused daylight or softbox key with bounce fill for natural texture.
- Angles: Top‑down for flat items; 45° for depth; low angle for tall stacks or beverages.
- Styling: Fresh garnishes last; gloss sauces right before capture; keep true portions.
- Tethering: Live review with your team for fast approvals and micro‑adjustments.
- Rhythm: Stage dishes in waves to keep steam and crisp textures authentic.
Post‑production
- Color accuracy: Neutral balance to match what guests see on the table.
- Retouching: Clean crumbs, reduce glare, preserve real textures and steam.
- Delivery: Print‑ready files plus optimized web/app images organized by menu section.
- Reuse planning: Crops for in‑store boards, website tiles, and vertical reels.
- Governance: Version control and a changelog for smooth seasonal updates.
| Phase | Key Actions | Owner | Output |
|---|---|---|---|
| Pre‑production | Brand brief, shot list, prop pull | Client + SVS | Approved plan + schedule |
| Production | Lighting, styling, tethered capture | SVS + Kitchen | Hero and detail images |
| Post | Retouching, export, naming | SVS | Print + web deliverables |
Want a plug‑and‑play approach? Our team handles the entire workflow, so you get consistent results without tying up staff. We can also fold in short vertical videos for social cutdowns during the same session.
Types, Methods, and Approaches
Effective menu photography uses a mix of hero images, ingredient macros, plating sequences, and context shots (tabletop, bar, or dining room). Selecting the right angle and light—top‑down, 45°, or low angle with diffused key—makes textures pop while keeping colors true to the dish guests will actually receive.
Each category on your menu benefits from a distinct but cohesive visual treatment. We map angles to dish types, then layer in details that show freshness and craft without distracting from the hero.
Core image types
- Hero dish: The main sales image—clean plate, simple props, strong light falloff.
- Detail macro: Textures like char, bubbles, and crisp edges; boosts perceived freshness.
- Ingredient close‑ups: Build trust by showing real components (herbs, sauces, grains).
- Combo shots: Mains with sides/beverage to guide add‑ons.
- Context frames: Table settings or bar scenes to convey vibe without text.
Angles that work
- Top‑down (90°): Best for flat foods (pizzas, salads, boards) and grid layouts.
- 45° front: Natural perspective for plates and bowls; keeps depth and steam.
- Low angle: Emphasizes height in burgers, stacks, and layered desserts.
| Angle | Best For | Strength | Watch Outs |
|---|---|---|---|
| Top‑down | Pizzas, boards, salads | Clean geometry; easy grids | Can flatten tall items |
| 45° front | Bowls, plates, pastas | Natural depth; steam visible | Mind background clutter |
| Low angle | Burgers, stacks, desserts | Emphasizes height; drama | Keep foreground in focus |
Lighting approaches
- Window light: Soft, flattering, and familiar; use diffusers during bright hours.
- Softbox key + bounce: Controlled, repeatable light for multi‑hour sessions.
- Backlight for translucency: Makes drinks, sauces, and greens glow.
- Flagging: Reduce spill and glare on glossy plates or soups.
Mix methods across a single menu: keep heroes simple, then use macros and context to tell a richer story on your website and socials. The same light can be tuned for beverages with backlighting and for mains with slight angle shifts.
Best Practices for Standout Menu Photos
Prioritize accurate color, true portions, and simple styling. Use a single, soft key light with bounce, plate on clean neutrals, and garnish last. Shoot tethered for real‑time approvals, and deliver print + web sizes with consistent naming so your menu updates stay fast and searchable.
Best practices help you avoid “too fake” or “too flat” outcomes. They also speed up approvals because everyone can see the same on‑brand choices repeated from dish to dish.
Styling
- Keep it edible: Favor real ingredients over fake tricks; drop garnishes last.
- Contrast the plate: Dark plates for pale foods, light plates for dark foods.
- Sauce strategy: Gloss right before capture; wipe rims and edges.
- Beverages: Use clear ice and backlight; show condensation naturally.
Composition
- Hierarchy: One hero per frame; keep props secondary.
- Breathing room: Leave safe crop space for text use and different aspect ratios.
- Lines and layers: Use cutlery and linens to lead the eye into the dish.
Workflow controls
- Tether + checklist: Approve focus, garnish, and portion before moving on.
- File naming: Use menu section + dish name + version for traceability.
- Color management: Calibrate monitors; export sRGB for web and CMYK proof for print.
For non‑photographers, this product photography checklist offers a simple baseline you can adapt to food sessions—especially for small, social‑first shoots where you need quick wins and consistent outputs.
Tools and Resources
A dependable menu shoot requires a camera or tethered laptop, diffused key light, reflectors, sturdy tripod, styling kit, and neutral backdrops. Plan delivery tools, too: organized file naming, sRGB web exports, and print proofs keep updates smooth across your menu, website, and delivery platforms.
In our kits, we carry softboxes for control, large diffusers for natural looks, and a surface library matched to brand palettes. We also bring a styling toolkit so micro‑adjustments happen in seconds, not minutes.
- Lighting: Softbox or large diffuser, silver/white bounce, flags for spill control.
- Camera support: Solid tripod for top‑downs; C‑stand with boom for repeatable angles.
- Styling kit: Tweezers, droppers, brushes, microfiber cloths, oil spray, spare herbs.
- Surfaces: Neutral stone/wood, matte plates to reduce glare, clean glass for beverages.
- Delivery stack: Cloud gallery, versioned folders, and alt text notes for web teams.
Going digital with menus? Explore practical approaches to online and app menus that pair well with photography through these resources on digitizing your restaurant and broader digital menu ideas.
Shot List Templates & Pre‑Shoot Checklist
A tight shot list keeps sessions efficient and complete. Group dishes by category, mark must‑have heroes, note angles, and include add‑ons you want to upsell. Pair the list with a pre‑shoot checklist so kitchen timing, props, and brand plates are ready before the first dish hits the set.
Below is a template you can copy into your planning doc. It keeps cooks, managers, and the photo team aligned without endless back‑and‑forth during service hours.
Menu shot list (example)
- Starters: 3 heroes (top‑down), 2 details (macro), 1 context (table).
- Mains: 6 heroes (45°), 3 details (macro), 3 combos (with sides/drink).
- Desserts: 2 heroes (low angle), 2 details (macro), 1 context (bar).
- Beverages: 3 heroes (backlit), 2 details (condensation), 1 group (flight).
Pre‑shoot checklist
- Brand plates, cutlery, linens selected and clean.
- Surfaces and props pulled; neutral backdrop available.
- Kitchen timings and dish order locked; staging table cleared.
- Garnish and duplicate ingredients prepped; spare herbs on ice.
- Tether station tested; naming convention documented.
We provide our clients with a living shot list and changelog. That way, seasonal swaps or LTOs slide into the plan without derailing the core library.
Brand Style & Consistency
Create a simple style system—light direction, angle by category, plateware palette, and prop rules—then repeat it. Consistency builds recognition and trust, speeds approvals, and lets guests scan quickly because every image “fits” the brand at a glance.
Your style system doesn’t need to be complex. It just has to be clear and repeatable. We document light angle, backdrop choices, and plate rules in a one‑page guide that any operator can follow for updates.
- Light: Right‑side key + white bounce for warm, approachable brands; top light for modern minimal.
- Angle: Top‑down for boards/salads; 45° for plates; low angle for tall items/desserts.
- Plateware: Matte neutrals to avoid glare; consistent rim widths across categories.
- Props: 1–2 accents max; linens and cutlery should not compete with the dish.
- Tone: Casual brands embrace crumbs and motion; premium brands keep negative space.
We align this with your broader brand content. If you’re planning a full refresh, see how our restaurant photography ideas inform styling choices, and how our commercial photography playbook keeps in‑store visuals aligned with web and print.
Menu SEO, Alt Text & AEO
Treat each hero image like a product photo: descriptive file names, alt text with dish and key ingredient, and consistent aspect ratios. Clear descriptions help search engines and answer engines understand your menu, improving visibility on your site and third‑party platforms.
Search and AI assistants rely on clean structure as much as pretty photos. That means naming, alt text, captions where appropriate, and logical grouping by category. Keep it simple and factual; avoid stuffing.
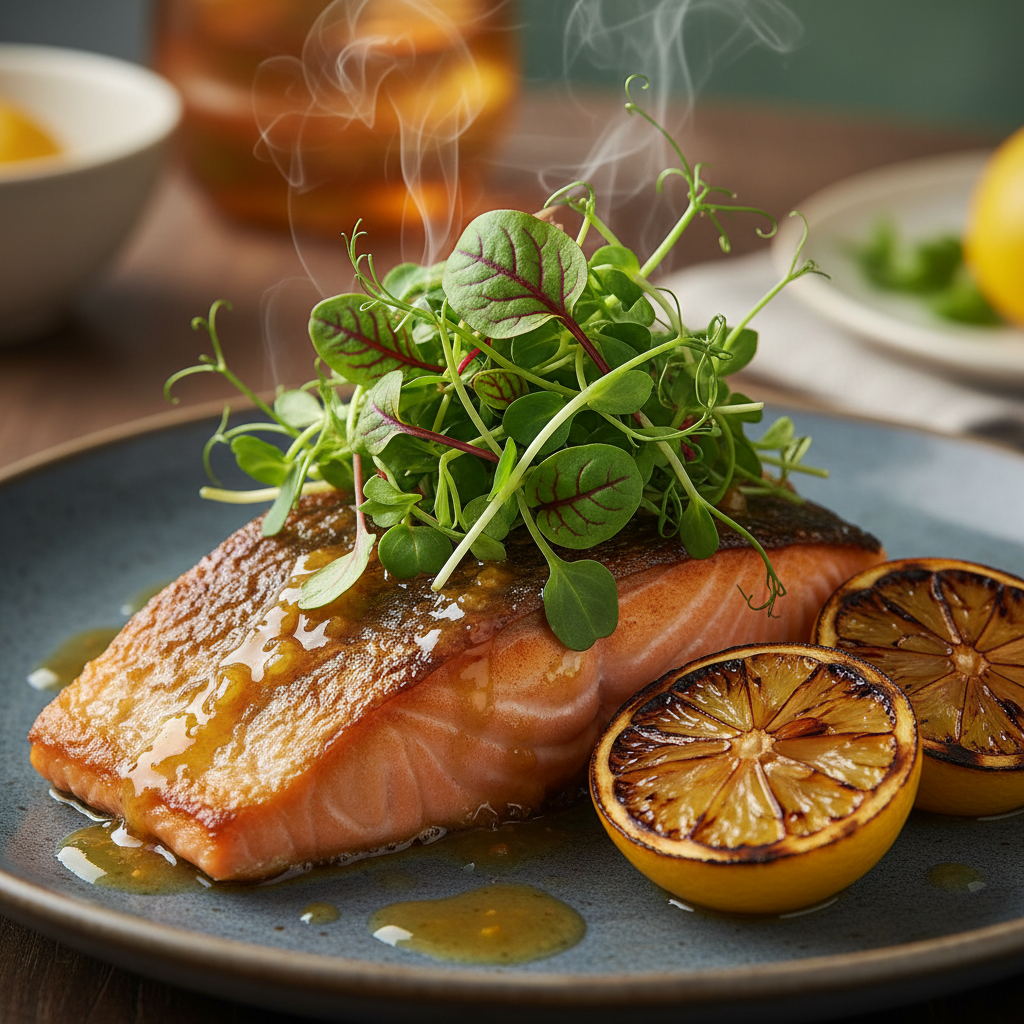
- File names: mains_salmon‑citrus‑glaze_hero_v3.jpg
- Alt text: “Seared salmon with citrus glaze and microgreens on matte plate.”
- Captions: Use sparingly to note allergens or special prep.
- Schemas: Ensure menu pages have clear headings and section anchors.
- Crops: Maintain safe margins for mobile, desktop, and in‑store boards.
For social amplification, our social content guide shows how to turn hero shots into reels and stories, while keeping file hygiene intact for your web team.
Platform Specs & Delivery
Deliver print‑ready masters plus optimized web and app exports. Keep consistent naming, organized folders by menu section, and notes for alt text. This speeds seasonal updates and prevents wrong crops or color shifts across platforms and displays.
Every platform has quirks. We manage those by exporting standard sizes and leaving crop‑safe margins in the hero composition. Your team gets a clear folder structure and a quick reference so updates take minutes, not hours.
- Print: High‑res masters (TIFF/PNG), CMYK proofed, crop‑safe composition.
- Web: JPEG/WebP in sRGB; consistent long edge for grid uniformity.
- App/delivery: Square and 4:5 variants with centered hero and breathing space.
- Naming: menu‑section_dishname_view_version; changelog maintained.
- Access: Cloud gallery with approvals and lightweight download options.
If you’re building or revamping a digital menu, see pragmatic planning ideas on digitizing your restaurant, then align photography specs accordingly. For small teams spinning up e‑commerce or curbside add‑ons, Shopify’s photography checklist is a helpful baseline for asset hygiene.
Need a fast, on‑brand menu image refresh? Our Maple Ridge team handles photos, vertical videos, and brand visuals in one coordinated session. Book a quick discovery call and we’ll map your shot list.
Case Studies and Examples
Real menu shoots succeed when brand, kitchen, and camera move in sync. These condensed scenarios show how pairing hero images with details, combos, and context frames clarifies choices and nudges add‑ons—while keeping plating and color faithful to what the guest receives.
Fast‑casual lunch concept (Greater Vancouver)
- Goal: Speed up ordering on web and delivery, highlight combos.
- Approach: Top‑down grid for bowls and salads; 45° for wraps and burgers.
- Outcome: Cleaner category pages, clearer add‑on pathways for sides and drinks.
BC bistro seasonal refresh (Maple Ridge)
- Goal: Showcase spring produce and seafood without over‑styling.
- Approach: Window light with bounce; detail macros on herbs, char, and sauces.
- Outcome: Cohesive spring look; website tiles and in‑store boards updated same week.
Coffee + bakery program (Tri‑Cities)
- Goal: Elevate pastries and specialty beverages for morning rush.
- Approach: Backlit drinks for translucency; low‑angle stacks for layered pastries.
- Outcome: Stronger hero images; easy social crops for reels and stories.
Pizza bar with weekend service
- Goal: Clarify slice vs. whole pie options and toppings.
- Approach: Top‑down heroes for full pies; 45° for by‑the‑slice with cheese pull.
- Outcome: Fewer order errors; toppings displayed clearly in macros.
Family‑style diner with LTOs
- Goal: Smooth monthly menu swaps without retraining staff.
- Approach: One‑page style guide; repeatable 45° setup with marked tripod spots.
- Outcome: Predictable approvals; updates completed in one afternoon.
Sushi + ramen house
- Goal: Show freshness and steam without looking staged.
- Approach: Backlit broths; macro on fish texture; chopsticks to lead eye.
- Outcome: Appetizing steam and translucency; higher add‑on rates for sides.
Steakhouse with premium positioning
- Goal: Convey quality and restraint; reduce glare on glossy plates.
- Approach: Soft, directional key; matte plateware; low‑angle heroes for height.
- Outcome: Elevated feel; improved scanability on desktop and mobile menus.
Plant‑forward café
- Goal: Celebrate color and texture without clutter.
- Approach: Top‑down for grain bowls; macro on seeds and dressings; neutral backdrops.
- Outcome: Vibrant yet honest images; faster decisions for first‑time guests.
Taproom with rotating flights
- Goal: Make weekly changes painless; highlight clarity and color in drinks.
- Approach: Backlight with flagging; consistent flight board; condensation details.
- Outcome: Clean series each week; reusable crops for web and in‑house screens.
We often bundle vertical video during food shoots to capture plating sequences and quick chef moments. Those short clips power Instagram Reels and TikTok, reinforcing your new images the week they go live. If you want to understand lighting crossover for other work, our food photography guide breaks down angles and setups we also use on menus, and our drone imaging guide outlines tasteful exterior ambiance images for signage and location context.
Frequently Asked Questions
These quick answers address the most common menu photography questions—from lighting and angles to scheduling and deliverables—so you can plan an effective session with minimal disruption to service.
What’s the best lighting for menu photography?
Use soft, directional light that mimics daylight. A large window with diffusion or a softbox key plus a white bounce gives texture without harsh shadows. Backlight beverages and translucent ingredients, and avoid mixed color temperatures to keep food looking natural.
Which camera angles should we use for different dishes?
Top‑down works for flat foods like pizzas, salads, and boards. A 45° angle suits bowls and most plated mains. A low angle highlights tall items like burgers or layered desserts. Consistency by category helps guests scan quickly and pick confidently.
How do we keep food looking fresh during a long shoot?
Stage dishes near the set, plate just‑in‑time, and add garnishes last. Use tweezers, oil spray, and paper towels for micro‑adjustments. Keep a back‑up portion ready and photograph heat‑sensitive items first so textures and steam look natural.
What files will we receive after the session?
You’ll receive print‑ready files and optimized JPEG/WebP exports for web and delivery apps. We organize assets by menu section with consistent naming, plus alt‑text notes for your web team. This makes seasonal updates fast and reliable.
Conclusion and Next Steps
Menu photography turns your dishes into a clear, compelling menu experience. With a tight workflow, accurate color, and reusable assets, you’ll speed up ordering, reduce returns, and strengthen brand perception across print, web, and delivery apps.
Key takeaways
- Keep color true, portions honest, and styling simple.
- Standardize angles by category to help guests scan quickly.
- Deliver both print and web sizes with consistent naming.
- Plan seasonal refreshes to capture produce at its best.
Action steps
- List your five highest‑margin dishes—those are your first heroes.
- Audit current images for color accuracy and portion honesty.
- Book a discovery call to align shot list, props, and schedule.
- Pair photos with short vertical videos to extend reach on socials.
Ready to elevate your menu visuals? Our Maple Ridge team pairs restaurant photography with vertical video and brand content to launch a cohesive refresh in days, not weeks. For broader context on how we approach photography across industries, explore our real estate photography guide—the planning discipline is the same even when the subject changes.
Related Topics in Our Photography Cluster
Menu photos work even harder when paired with brand and social content. Explore adjacent topics like restaurant photography, social‑first visuals, and commercial imagery to round out your marketing toolkit and stay consistent across every channel.
If you’re planning a full refresh, see how our restaurant photography ideas inform styling choices. For social amplification, our social content guide shows how to turn hero shots into reels and stories. Want to understand lighting crossover? Our food photography guide breaks down angles and setups we also use on menus. For brand‑wide consistency, the commercial photography playbook explains how to align in‑store visuals with web and print. Exterior ambiance helps, too—our drone imaging guide outlines tasteful aerials for signage and location context.