
Listing photos are the professionally captured and edited images used to market a property online and in MLS. Strong listing photos attract more clicks, longer viewing time, and more showings. From our Maple Ridge, BC studio at 13260 236 St, Silver Valley Studios Inc. creates listing photography, video, floorplans, and drone media that help homes stand out.
By Silver Valley Studios Inc. — Maple Ridge, BC • Last updated: 2026-06-14
Overview
Listing photos should tell a clear, accurate story of a home within seconds. Prioritize composition, natural light, and room-to-room flow. Pair photos with floorplans, video tours, and aerials to maximize engagement and in‑person showings across Greater Vancouver and Vancouver Island.
Great real estate marketing is built around images buyers can trust. We combine clean, HDR‑blended photography with cinematic video tours, 2D floorplans, vertical reels, and drone coverage—so your listing media earns more clicks, more saves, and faster showings.
- What you’ll learn: what listing photos are, why they matter, and how pros make them.
- Step‑by‑step: our Maple Ridge production workflow from prep to delivery.
- Buying guide: how to pick a real estate media partner with confidence.
- Tools: cameras, lenses, HDR bracketing, lighting, floorplans, and drones.
- Local context: Maple Ridge and BC market nuances for real estate media.
What Are Listing Photos?
Listing photos are curated, high‑quality images that showcase a property’s rooms, finishes, and lifestyle highlights across MLS, portals, and social media. They set first impressions, guide buyer attention, and influence which homes get toured next weekend.
At Silver Valley Studios Inc., “listing photos” extend beyond stills. We design complete visual sets: HDR photography, 2D floorplans, cinematic 4K tours, vertical social clips, and aerials. That bundle helps buyers understand layout quickly and imagine how they’ll live in the space.
Key elements of an effective listing set
- Cover image with impact: Wide, bright, and welcoming. It should communicate style and scale instantly.
- Logical photo order: Exterior → entry → main living → kitchen → dining → primary suite → baths → secondary rooms → yard.
- Accurate color and exposure: We blend multiple exposures (HDR) for natural‑looking light.
- Scale cues: Include consistent heights and lens choices to avoid distortion and misrepresentation.
- Context media: Floorplans show flow; video reveals movement; drone establishes location and lot characteristics.
Buyers don’t just want pretty; they want clarity. That’s why pairing photos with floorplans and video reduces confusion, improves confidence, and shortens the path to an offer.
Why Listing Photos Matter in Maple Ridge and BC
In Maple Ridge and BC, listing photos are the first showing. They decide whether a buyer books a tour. Clean, honest imagery performs best, especially when combined with floorplans, drone context, and short‑form video tailored to local search behavior.
Across Greater Vancouver and Vancouver Island, competition is visual. Neighborhoods can shift block‑to‑block, and buyers scan dozens of listings before they read a word. Consistent, brand‑aware imagery helps your properties rise above the noise while staying true to the space.
Local considerations for Maple Ridge
- Schedule Golden Hour exteriors when cloud layers are soft; Pacific Northwest light flatters siding, wood tones, and landscaping.
- Spring and early fall often bring the most balanced daylight windows; plan interiors then to minimize mixed lighting.
- Highlight storage, mudroom flow, and outdoor living—practical draws for families moving across the Lower Mainland.
We’ve found that authenticity wins. If a home’s charm is its bright kitchen and deck, lead with those assets. If privacy and lot size are the story, aerials convey it faster than copy ever will.
How Listing Photos Work: Our End‑to‑End Workflow
A reliable listing media workflow covers prep, capture, and delivery: consult and staging checklist; HDR and composition on site; floorplans and drone; color‑true editing; and next‑day delivery organized for MLS, print, and social.
1) Pre‑production
- Discovery call: Goals, target buyers, standout features, and brand alignment for teams.
- Prep checklist: Clear countertops, hide bins, replace bulbs, align window coverings, stage minimal props.
- Scheduling: Pick times with steady daylight; plan exteriors at sunrise/sunset when possible.
2) On‑site capture
- Composition first: Level horizons, corner‑to‑corner lines, and consistent camera height.
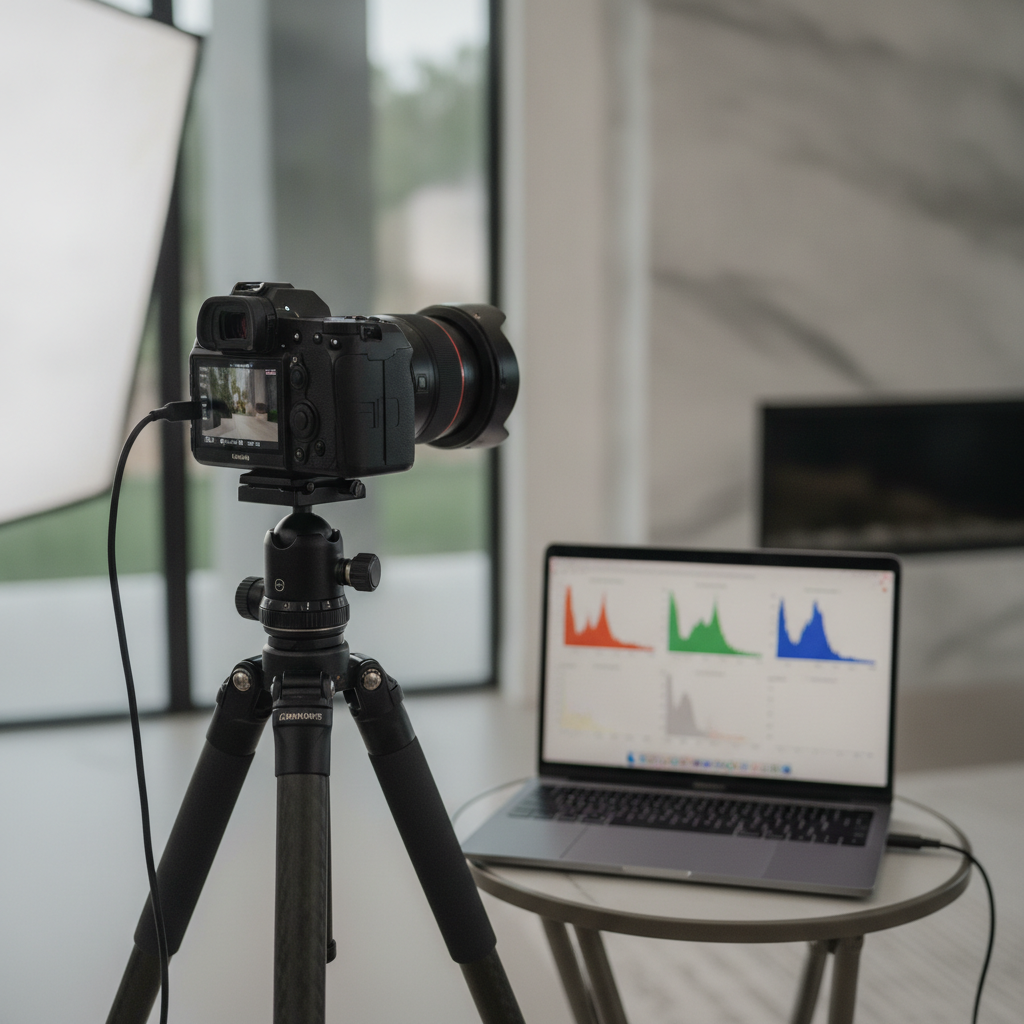
- HDR bracketing: Multiple exposures for balanced windows and shadows.
- Detail frames: Finishes, appliances, and unique architectural touches.
- Floorplans: 2D scans to map flow and dimensions.
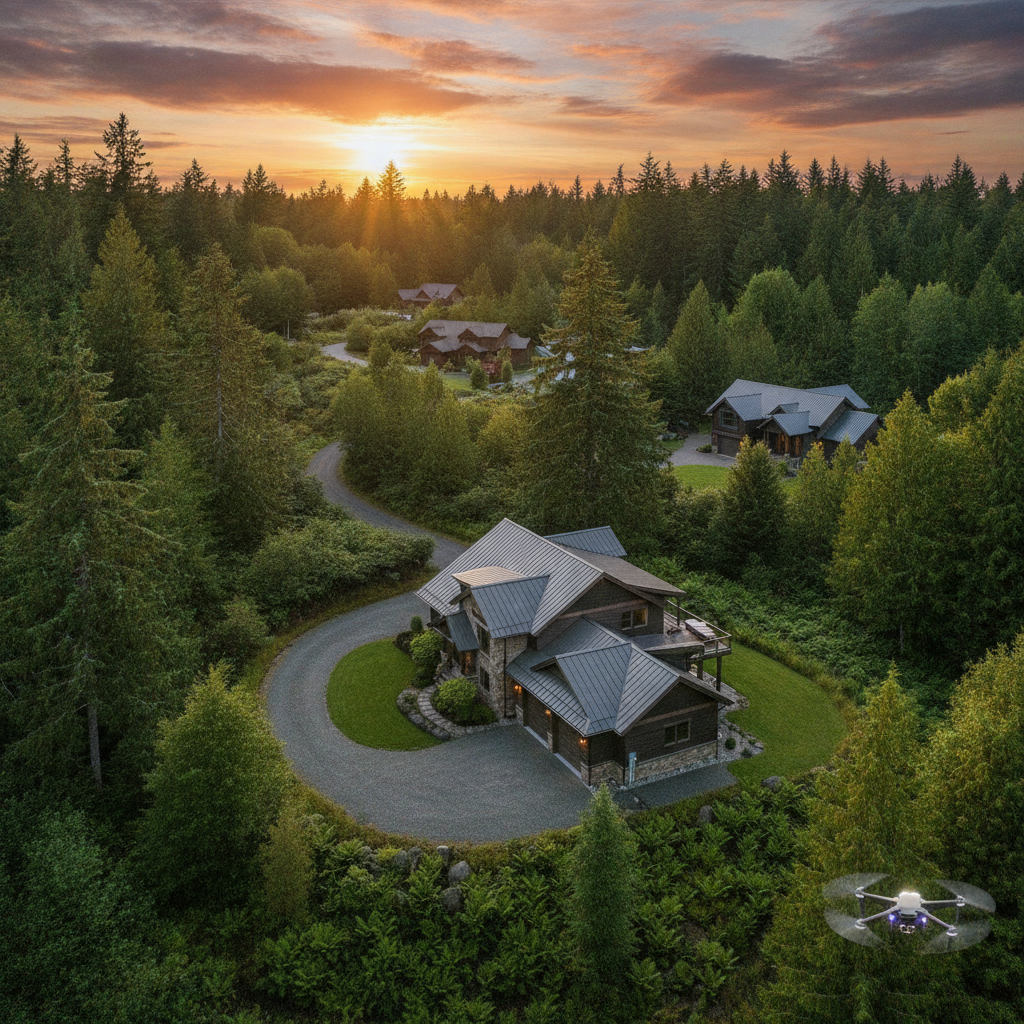
- Drone (conditions permitting): Lot, roof, and neighborhood context.
3) Post‑production and delivery
- Color‑true edits: Natural whites and wood tones; avoid plastic over‑saturation.
- Lens and geometry corrections: Straight walls, no fisheye look.
- File sets for MLS, print, and social: Organized folders and aspect ratios, including vertical cuts.
- Next‑day turnaround (project dependent): Media arrives labeled and ready to publish.
If you need a complete campaign, we integrate our real estate photography services with video tours, floorplans, and drone so your listing launches as a cohesive set—no cobbling pieces from multiple vendors.
Types of Listing Photos and When to Use Them
Use a core set of wide, well‑lit room photos, then add details, lifestyle vignettes, twilight exteriors, and aerials as the property warrants. Pair with floorplans and video to answer layout, light, and location questions quickly.
Core images (must‑haves)
- Front exterior: Primary hero; curb appeal sells the click.
- Main living area: Show flow between living, kitchen, and dining.
- Kitchen: Islands, appliances, and workspace scale.
- Primary suite: Bed wall, windows, and ensuite access.
- Backyard/patio: Practical outdoor living is a decision driver in BC.
Context and storytelling
- Detail frames: Hardware, tile, millwork—signals of care and quality.
- Lifestyle vignettes: A reading nook, coffee corner, or desk area.
- Twilight: Warm, inviting exteriors; helpful for high‑end or view homes.
- Drone: Lot and surroundings—especially valuable for acreage and new builds.
When we photograph in Maple Ridge or Langley, we often feature covered decks and mudrooms; in Vancouver proper, efficient kitchens and windowscapes tend to lead the set. The order and emphasis should mirror buyer priorities in that micro‑market.
Best Practices for Listing Photos (Pro Tips)
Keep horizons level, corners clean, and exposure natural. Stage lightly, remove clutter, and use consistent camera height. For accuracy and appeal, blend bracketed exposures (HDR), correct lens distortion, and keep colors true to the space.
Room setup and styling
- Declutter: Clear counters and floors; remove personal photos.
- Symmetry where it helps: Straighten chairs, center rugs, align blinds.
- One accent per scene: Plant, bowl, or throw—never all three competing.
Technical execution
- Tripod + level: Keeps frames consistent and professional.
- Bracketed exposures: Preserve window views without crushing interiors.
- Neutral white balance: Avoid orange casts from mixed bulbs.
- Geometry corrections: Straight verticals create trust.
Sequencing for engagement
- Lead with the hero: Exterior or the most compelling room.
- Tell the tour story: Entry to main living to private zones.
- Answer layout questions: Back up photos with a clear photo strategy and 2D floorplans.
Small decisions add up. A centered composition and a clean color profile can be the difference between a scroll‑past and a saved listing.
Tools and Resources We Rely On
Professional listing media blends the right tools: full‑frame cameras, ultra‑wide lenses, sturdy tripods, HDR brackets, color‑managed editing, 2D floorplans, drone coverage, and vertical‑first delivery for social.
- Cameras and lenses: Full‑frame bodies with 14–24mm or 16–35mm lenses for interiors; 24–70mm for details.
- Stability: Solid tripod and remote trigger to prevent micro‑blur.
- Lighting: Natural‑first approach, with fill where needed—never “flashy.”
- Editing: Color‑managed monitors, calibrated profiles, and careful HDR blending.
- Floorplans: Precise 2D plans that pair with photos to communicate flow.
- Drone: Aerials that confirm lot, roof condition, and surroundings.
- Delivery: MLS‑ready sets plus social crops and vertical video clips.
For end‑to‑end campaigns, explore our property photos guide and real estate portfolio to see how images, plans, video, and drone come together.
Buying Guide: Choosing a Listing Media Provider
Choose a provider that offers consistent, natural images, plus video, floorplans, and drone under one roof. Review full galleries, ask about HDR and geometry corrections, and confirm delivery formats for MLS, print, and social.
What to look for
- Quality and style: Clean, true‑to‑life color with balanced windows.
- Full‑stack offerings: Photos, video tours, 2D floorplans, drone.
- Turnaround and organization: Labeled folders and aspect ratios.
- Service footprint: Coverage across Greater Vancouver and Vancouver Island.
- Realtor brand alignment: Consistency with your team’s marketing.
Questions to ask
- How do you approach HDR and mixed lighting?
- What file sizes deliver best quality on MLS and portals?
- Can you provide vertical deliverables for reels and stories?
- How are floorplans and room dimensions presented?
- What’s your policy on re‑edits or reshoots if weather shifts?
Want a starting point? Browse our Maple Ridge‑based real estate photography services to see standard deliverables and how we structure visual sets for buyer clarity.
Smartphone vs. Pro Listing Photos (Comparison)
Smartphones are great for behind‑the‑scenes and teasers. Professional sets deliver consistent geometry, accurate color, balanced windows, floorplans, and aerial context—everything buyers need to decide to book a showing.
| Aspect | Smartphone | Professional Set |
|---|---|---|
| Lens & Geometry | Ultra‑wide distortion; variable heights | Calibrated ultra‑wide; corrected verticals |
| Exposure & Color | Blown windows; mixed color casts | HDR balance; neutral, accurate color |
| Consistency | Scene‑to‑scene varies | Planned sequence and style |
| Context Media | Limited | Floorplans, video tours, drone |
| Buyer Confidence | Lower | Higher |
We still use smartphones strategically—for agent teasers and same‑day social stories—while the main gallery stays polished and consistent for MLS and portals.
Case Studies and Real Examples
Real results come from clarity and completeness. Here are mini case snapshots showing how photos, floorplans, video, and drone work together to earn attention and showings in competitive BC markets.
Maple Ridge family home
- Challenge: Buyers struggled to understand a split‑level layout from prior photos.
- Approach: Re‑shoot with HDR, clear sequencing, 2D floorplan, drone of lot and yard.
- Outcome: Showings increased once buyers saw the flow from entry to main living to bedrooms.
Langley new build
- Challenge: Competing against several similar homes launching the same week.
- Approach: Emphasize kitchen finishes and pantry storage; add twilight exterior and vertical reels.
- Outcome: Listing gained strong save/share activity, leading to a busy first weekend.
Vancouver townhouse
- Challenge: Narrow main floor looked cramped in prior photography.
- Approach: Lower camera height, corner‑to‑corner composition, consistent geometry corrections.
- Outcome: Space read wider and more livable; traffic improved.
Want to vet our approach? Explore our real estate photography portfolio and realtor branding photos to see how we balance accuracy and appeal.
Staging and Prep that Pay Off
Small prep wins—decluttering, bulb changes, and simple styling—make photos read cleaner and brighter. Clear surfaces and consistent lighting let rooms feel bigger and more inviting in galleries and on mobile screens.
- Surfaces: Countertops, vanities, and nightstands should be nearly empty.
- Lighting: Replace mixed bulbs; open blinds evenly; avoid harsh spotlights.
- Textiles: Smooth bedding and aligned towels calm the frame.
- Entry and mudroom: Store shoes and coats; showcase storage solutions.
For a broader seller perspective on prep and presentation, review this practical seller’s guide from a real estate team. It aligns with what we see move the needle in photo‑led marketing.
How Photos, Video, Floorplans, and Drone Work Together
Photos earn the click; video earns time; floorplans earn confidence; drone earns context. Together, they answer the buyer’s four biggest questions: What does it look like, how does it flow, what’s around it, and is it worth touring?
- Photos: Fastest way to scan finish level, light, and space.
- Video: Movement and sound design create emotional connection.
- Floorplans: Objective view of layout and dimensions.
- Drone: Lot lines, roof condition, and proximity cues.
If your team wants a single vendor to coordinate all four pillars, start with our real estate photography services and video tours—we plan captures to serve both MLS and social in one visit.
Common Mistakes to Avoid
Avoid heavy wide‑angle distortion, over‑processed colors, mixed color temperatures, and cluttered frames. Don’t bury the lead—open with the home’s strongest image, and keep the sequence clean and logical.
- Fisheye look: Distorts trust; stick to corrected ultra‑wides.
- Orange/blue casts: Balance bulbs or shoot with natural light windows.
- Over‑HDR: Plastic sheen turns buyers off—aim for natural.
- Busy styling: Too many props distract from space and light.
Solid fundamentals beat gimmicks every time. If a frame looks “processed,” it probably is—dial it back.
Process Checklist You Can Use This Week
Follow a simple weekly routine: prep the home, shoot a hero exterior and clean interiors, add floorplans, and publish a consistent story from listing to social. Review analytics and resurface best frames mid‑week.
- Confirm a tidy, staged property 24 hours before your shoot.
- Shoot main living spaces, kitchen, primary suite, and backyard first.
- Add details, lifestyle frames, and any twilight exteriors.
- Capture 2D floorplans and, if useful, a few drone frames for context.
- Deliver MLS set plus vertical clips for posting day and mid‑week.
- Refresh cover photo mid‑week if engagement slows.
Need help organizing the mix? Our Maple Ridge team handles capture and delivery across photos, plans, video, and drone so your agents can focus on client work.
Frequently Asked Questions
These quick answers cover the most common questions we get from realtors and sellers about listing photos, floorplans, video, and drone media across Greater Vancouver and Vancouver Island.
How many listing photos should I include?
Include enough images to tell a complete, honest story—usually the main exterior, key living spaces, kitchen, primary suite, baths, secondary rooms, and outdoor areas. Pair the gallery with a floorplan so buyers can understand the layout quickly.
What’s the best time of day to shoot?
For exteriors, aim for early morning or late afternoon when the sun is lower and shadows are softer. For interiors, pick a time with consistent daylight. Overcast conditions often work well in BC because they provide even, flattering light.
Do I really need floorplans with my listing photos?
Yes—floorplans answer layout questions that photos and video can’t fully resolve. They reduce confusion, increase buyer confidence, and help out‑of‑town buyers decide to tour. We provide clear, two‑dimensional plans that complement your gallery.
When should I add drone images?
Use drone when the lot, roofline, views, or neighborhood placement impact the story. Acreage, new builds, and homes near natural features benefit most. We’ll check local flight conditions and restrictions before planning aerials.
How do I prepare the home before you arrive?
Declutter surfaces, replace mismatched bulbs, open blinds evenly, and secure pets. Make beds, align towels, and store bins and small appliances. We’ll share a simple prep checklist during scheduling so shoot day is smooth.
Key Takeaways
Treat listing media as the first showing: honest, organized, and complete. Combine clean photos, floorplans, video, and drone for clarity. Sequence images like a tour, and lead with the strongest frame to earn the click.
- Listing photos drive clicks; floorplans, video, and drone convert curiosity into showings.
- Natural color, corrected geometry, and light staging create trust at a glance.
- Plan shoots around BC’s soft daylight; schedule exteriors for Golden Hour.
- Use vertical cuts for social without sacrificing the MLS gallery’s polish.
- One team, one workflow—simplify delivery and stay brand‑consistent.
Thinking about your next listing? Our Maple Ridge team can plan photos, floorplans, video, and drone in a single visit—aligned to your brand and timeline. Reach out through our real estate photography services page to get started.
Further Learning and Seller Perspectives
Review broader seller resources to align staging and marketing with strong visuals. Curated articles below echo what we see work in photo‑led launches across BC markets.
For owner preparation checklists and marketing context beyond media execution, see this for‑sale‑by‑owner guide. To align staging choices with visual impact, here’s a concise look at why staging matters. For a seller‑oriented overview from another perspective, explore this seller’s guide.