
Flambient photography is the technique of blending flash and ambient light to produce clean, natural-looking real estate images. It controls color casts, bright windows, and mixed lighting for consistent results. From our Maple Ridge studio at 13260 236 St in BC, we use flambient on listings across Greater Vancouver to deliver balanced visuals that sell.
By Sumeet S., Founder & CEO — Silver Valley Studios Inc.
Last updated: 2026-05-14
Above-the-fold: hook and contents
This guide shows you how to shoot and blend flambient frames for polished, market-ready real estate photos. You’ll learn the core workflow, minimal gear, and practical tips we use daily at Silver Valley Studios so you can achieve consistent, natural results without heavy equipment or complicated setups.
Here’s what you’ll find in this complete, field-tested guide:
- What flambient photography is and when to use it
- Why it matters for Maple Ridge and BC listings
- Step-by-step shooting and blending workflow
- Methods and variations (window pulls, twilight, single-flash)
- Best practices for color, shadows, and speed
- Tools and software we rely on
- Mini case studies from real projects
Jump to a section:
- What is flambient photography?
- Why it matters for Maple Ridge and BC
- How flambient works (step-by-step)
- Types and approaches
- Best practices
- Tools and resources
- Case studies and examples
- FAQ
- Conclusion
- Related articles
Quick summary
Flambient combines an ambient base frame with one or more flash frames, then blends them for realistic tone and color. Shoot 5–7 ambient brackets, add 1–3 tasteful flash pops, and merge in post. Expect accurate whites, clean window detail, and fewer color casts than HDR-only or flash-only approaches.
- Ambient base: 5–7 brackets at 1.0 EV steps for dynamic range.
- Flash frames: typically 1–3 per room at 1/16–1/8 power.
- White balance: target 4000–5000K for most interiors.
- Exposure: ambient shutter 1/4–1s; ISO 100–400 for clean files.
- Blend time: 2–3 minutes per image once your presets are dialed.
What is flambient photography?
Flambient photography is a real estate method that blends flash and ambient light to achieve natural-looking, color-accurate interiors with controlled windows and soft shadows. It pairs the room’s existing light with strategic flash pops, then merges the frames in post for balanced, polished results buyers trust.
In practice, you capture two kinds of images: an ambient “as-is” set (often bracketed), and one or more flash frames. The ambient set preserves the room’s feel and window view. The flash frames clean up color casts, lift shadows, and sharpen texture.
- Ambient preserves mood and view detail.
- Flash corrects color, adds crispness, and evens contrast.
- Blending balances both without the plastic look of aggressive tone mapping.
At Silver Valley Studios, we use flambient on condos, townhomes, and detached homes across Greater Vancouver. It pairs well with our Real Estate Media services and keeps the visual story consistent with our videography deliverables.
Why flambient matters for Maple Ridge and BC listings
In Maple Ridge and across BC, flambient helps manage overcast skies, reflective surfaces, and mixed color temperatures. The method delivers accurate whites, controlled windows, and inviting warmth—key traits that make listings scan well on MLS, social feeds, and agent sites.
Weather and architecture in our region create real challenges—cloud cover shifts minute to minute, and cool daylight mixes with warm interior bulbs. Flambient smooths those transitions so whites stay neutral and wood tones read true. Buyers scrolling on mobile notice the difference in seconds.
- Neutral whites reduce the “dingy” look in cloudy light.
- Window control preserves mountain or skyline views for context.
- Softer shadows keep countertops and cabinetry looking premium.
Local considerations for Maple Ridge
- Plan for fast-moving cloud cover: lock a base composition and time flash pops between brightness swings.
- Rainy-day shoots: keep ISO under 400 and add one extra flash frame to lift contrast without harshness.
- Wood-heavy interiors: gel or bounce to maintain natural warmth while holding true whites on trim.
We apply the same discipline when producing social-ready vertical teasers and listing tours, keeping stills and motion aligned for a cohesive brand story.
How flambient works: step-by-step
A reliable flambient workflow captures an ambient bracket set, adds clean bounce-flash frames, and blends in post to taste. Keep the camera locked, meter for windows, pop flash for neutral color, and merge with simple masks. The goal: bright, believable rooms that feel like being there.
Here’s a field-tested process we use on most shoots:
- Stage and lock composition. Declutter, level the tripod, and frame for straight lines. Aim for 24–28mm full-frame FOV.
- Set base exposure. Manual mode, f/7.1–f/8 for sharpness; ISO 100–200; shutter varies with ambient.
- Capture ambient brackets. 5–7 exposures at ±1 EV steps to protect highlights and lift shadows.
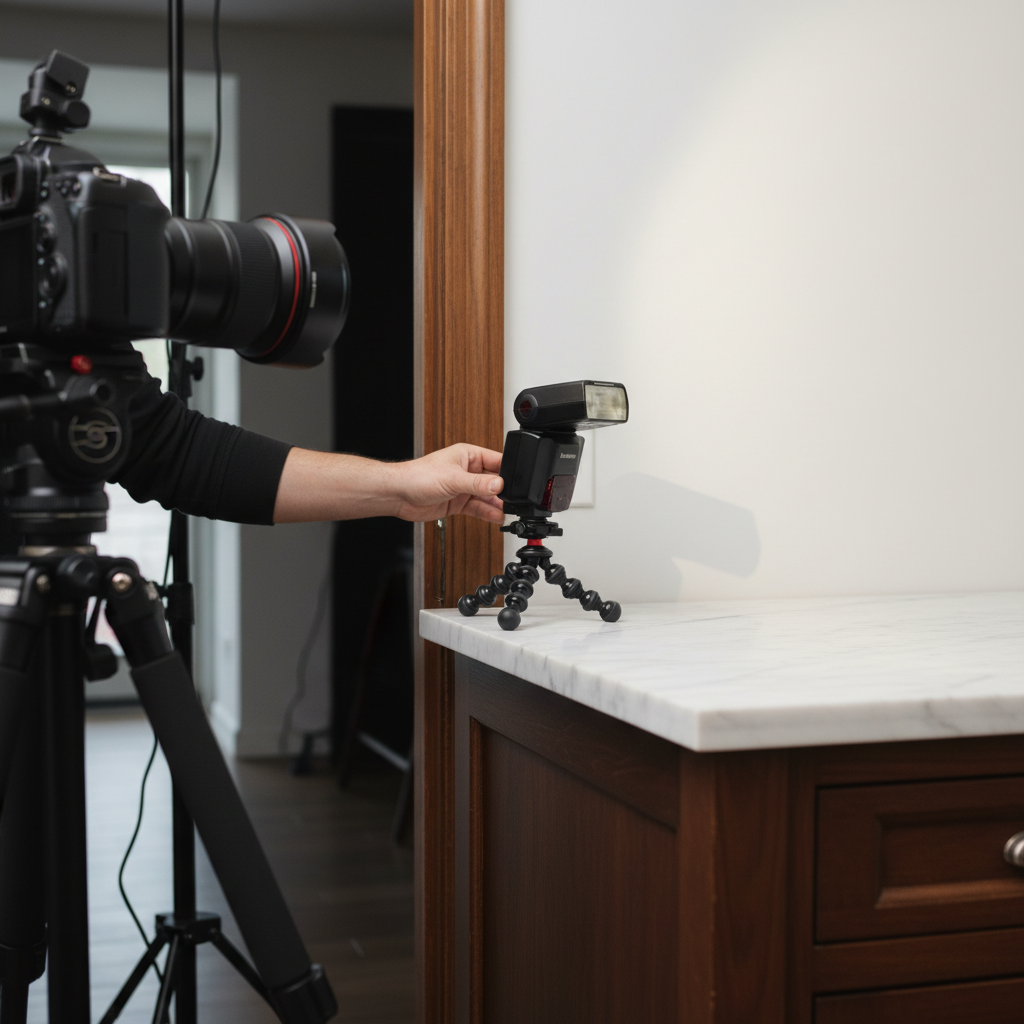
- Add a clean flash pop. Bounce off ceiling or a wall at 1/16–1/8 power; avoid hotspots and specular glare.
- Feather and flag. Angle flash to kiss surfaces, and flag to prevent light spilling into reflective areas.
- Optional window pull. A low-power, directional pop toward the window frame helps recover view detail.
- Repeat for variations. For large spaces, grab a second flash frame from the opposite side.
- Blend in post. Use masks or luminosity selections to combine the best of ambient and flash in 2–3 minutes.
Most rooms are covered with one ambient set and one tasteful flash frame. Large, open-concept areas may need a second pop. The key is restraint—your photo should feel natural, not obviously lit.
Types, methods, and approaches
Flambient is flexible. You can run single-flash bounce for speed, add window pulls for view control, or build multi-pop composites in complex spaces. Choose the lightest method that still delivers accurate whites, clean windows, and soft, believable shadows.
Common variations
- Single-bounce flambient: One flash pop bounced off ceiling or wall. Fast and natural for small rooms.
- Window pull add-on: Direct a low-power pop toward the window frame to capture outdoor detail.
- Multi-pop composite: Two to three pops from different angles for open-concept or dark wood cabinetry.
- Twilight flambient: Balance warm interior lamps with blue-hour ambient for inviting contrast.
Flambient vs HDR-only vs flash-only
| Approach | Color accuracy | Window detail | Shadow quality | Typical frames |
|---|---|---|---|---|
| HDR-only | Can skew warm/cool | Good, may halo | Flat if overdone | 5–9 brackets |
| Flash-only | Neutral whites | Controlled | Risk of harshness | 1–3 pops |
| Flambient | Best balance | Excellent | Soft and natural | 5–7 + 1–3 pops |
We prefer flambient because it’s forgiving in mixed light, preserves the room’s feel, and avoids the crunchy look of heavy HDR. It also scales: you can move fast in small rooms, then level-up control for complex kitchens or great rooms.
Best practices (what we do on real shoots)
Keep it simple, consistent, and color-true. Control your bounce angle, meter for highlights, and blend with a light touch. Build a repeatable checklist so every room hits the same mark—bright, clean, and believable on mobile and desktop.
Capture discipline
- Lock tripod height around counter height (36 in) for kitchens; slightly higher for great rooms.
- Use 24–28mm for context; switch to 16–20mm only when necessary.
- Bracket 5–7 shots at 1.0 EV; keep ISO ≤ 400 for crisp detail.
- Feather flash across ceilings/walls; avoid blasting directly at surfaces.
Color and consistency
- Set white balance between 4000–5000K; fine-tune in post per room.
- Use gentle HSL corrections to neutralize greens from foliage spill or blues from skylight.
- Maintain true whites on trim; let wood retain its character without orange cast.
Speed without shortcuts
- Target 2–3 minutes to blend each final photo with practiced masks and presets.
- Capture 2–3 flash frames only when needed; single-pop wins for speed in small rooms.
- Deliver 25–40 photos for most listings to cover story beats without redundancy.
Need a consistent system? Our team can plan, shoot, and blend a full listing using flambient, then align the look with your reels and tours. See our services overview or explore recent projects.
Tools and resources (minimal kit, maximum control)
You don’t need a truckload of gear. A tripod, wide lens, one speedlight, and reliable post-production tools will get you 90% of the way. Add a second light for large rooms and a flag for spills. The right software makes blending fast and repeatable.
Minimal field kit
- Full-frame body; 16–35mm or 17–28mm wide zoom; sturdy tripod.
- One speedlight (1/1 to 1/128) with radio trigger; optional second speedlight.
- White card or small softbox for feathered bounce; compact flag or black card.
Post-production stack
- Catalog and cull in Lightroom; use HDR Merge for a clean ambient base.
- Blend ambient + flash in Photoshop with gradient masks or luminosity selections.
- Save repeatable actions to keep blends at 2–3 minutes per image.
Planning matters as much as gear. For solid briefing habits and shot lists, see this Shopify creative brief guide—the principles translate well to real estate shoots.
Video complements flambient stills. Short vertical teasers (10–15 seconds) help listings get noticed on social. For context on why pro motion assets lift brand performance, review this videography strategy article. If you need help producing cohesive packages, our videography services are built for that.
Virtual tours and interactive walkthroughs pair nicely with flambient stills; browse a sample tag hub on virtual tours to see formats buyers engage with, then align your media plan accordingly.
Explore our portfolio and a recent commercial interiors project for examples of color-true spaces and balanced window detail.
Case studies and on-set examples
Real rooms show why flambient works. In compact condos, one pop cleans color and sharpens texture. In wood-forward homes, a second pop preserves warmth while keeping trim neutral. Twilight sets balance cozy interiors with cool exteriors—great for thumbnails and hero images.
Maple Ridge townhome, overcast afternoon
We framed a 26mm view of the living/kitchen. Ambient base was 6 brackets (±1 EV). One bounce pop at 1/8 power off the ceiling removed green spill from the patio. Blend time: ~2 minutes. Result: neutral whites, readable exterior, and soft shadow transitions on the island.
Surrey new build, great room with two-story windows
Large volume needed two pops—left wall at 1/16 to lift cabinetry, right wall at 1/8 for ceiling fill. Ambient base was 7 brackets to protect highlight rails. Masking emphasized the flash frame for color, keeping ambient for view detail. Final felt bright yet grounded.
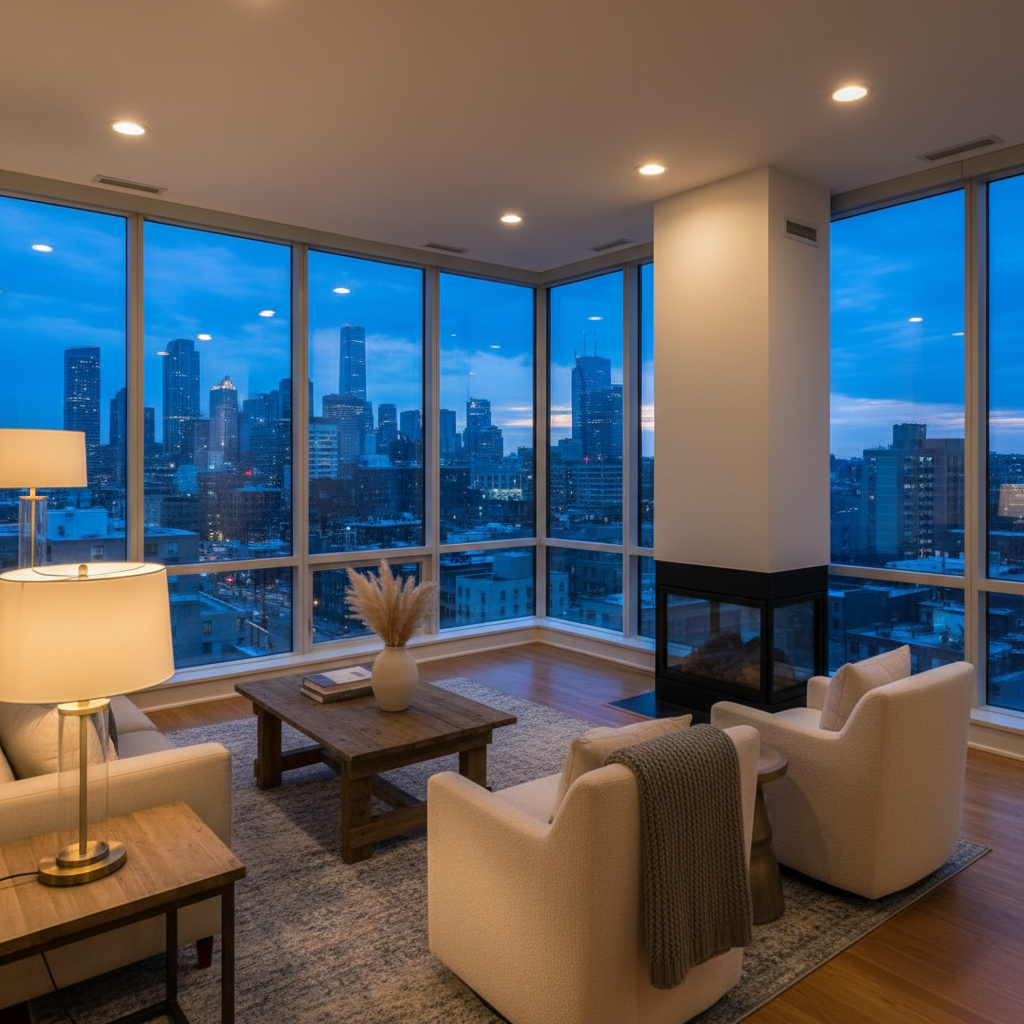
Vancouver condo, twilight hero
We shot blue hour at f/8, ISO 200, 1/2s ambient with lamps on. One feathered pop kept whites honest around the TV wall while preserving city lights. This pair became the first gallery image and the social thumbnail, matching our motion style for the unit’s short tour.
If you want this look across photo and video, we can map a storyboard that includes stills, a 30–60s tour, and 10–15s vertical reels—each built from the same compositions for brand cohesion.
Frequently asked questions
These quick answers address the most common flambient questions we hear from realtors and marketing teams. Each response is direct and field-tested so you can put it to work on your next listing.
What is the basic flambient shot sequence?
Lock your composition, capture 5–7 ambient brackets, add one bounce flash pop at 1/16–1/8 power, and blend in post. Use luminosity or gradient masks to combine ambient mood with flash-driven color accuracy and detail.
How many flash pops do I need per room?
Most rooms need a single, clean bounce pop. Large spaces or heavy wood cabinetry may need a second pop from the opposite side. Keep the look natural—if the image feels obviously lit, dial back or adjust your feathering angle.
Does flambient replace HDR?
Not exactly. We still capture a modest HDR bracket to protect windows and shadows. Flambient uses that ambient base for mood and view detail, then adds flash for color accuracy and soft contrast. It’s the balance that makes rooms feel real.
Can I use flambient for commercial interiors?
Yes. Offices, gyms, and retail benefit from neutral whites and consistent brand color. We pair flambient stills with motion coverage on commercial shoots to keep campaign assets aligned across web, print, and social placements.
Conclusion
Flambient photography blends the honesty of ambient light with the control of flash. It produces bright, credible real estate images with true color and gentle shadows—ideal for MLS, social, and brand sites. Keep the method simple and consistent, and it will scale to any floor plan.
- Stick to a repeatable capture order and simple bounce angles.
- Use modest flash power to keep rooms feeling real.
- Blend quickly with masks and presets—2–3 minutes per image is achievable.
- Align stills with your video and reels for brand cohesion.
Ready to standardize your listing visuals? Explore our real estate media services, view our portfolio, or contact our Maple Ridge team to book a session.
Related articles and next steps
To deepen your workflow, pair flambient stills with story-driven tours, vertical reels, and clean floor plans. These assets reinforce each other and help buyers understand space, flow, and finish quality in seconds.
- See how our motion style complements stills on the videography services page.
- Browse recent projects to study composition and color control.
- Read about our approach on the About us page and how it informs on-set decisions.